
twitter
    Find out what I'm doing, Follow Me :)
Showing posts with label Firefox. Show all posts

Friday, September 2, 2011

Light Switch, Dim Everything But Media In Firefox

It can sometimes be very irritating to interact with elements on a web page if other page elements catch your attention as well. Have you ever tried to watch a video on a web page only to be distracted by an animated banner on the same page? Or maybe you have played games and more than once failed to complete your objective because you have looked over at the auto-updating chat window?

That’s where browser extensions like the previously reviewed Turn off the light for the Google Chrome browser may help.

Light Switch is a comparable add-on for the Firefox web browser. There is definitely no shortage of add-ons of that kind at the Firefox add-on repository, but Light Switch appears to be one of the better add-ons of its kind.

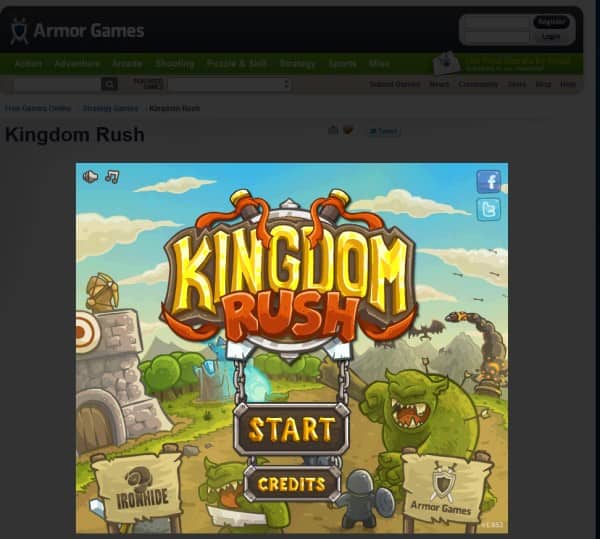
The browser add-on adds a single button next to multimedia elements on a web page after installation. This icon acts like a switch that dims all parts of the screen but the multimedia element. It works well on nearly every web site with multimedia elements. This includes video portals like YouTube, Gametrailers or Dailymotion, and Flash gaming websites such as Kongregate or Armorgames. There is actually not a single web site that I tested where the Firefox add-on did not work properly on.
light-switch

A click on the icon dims the background elements on the page, another click returns them to their previous stage. The effect is instant and very smooth.

Firefox users who prefer a different opacity for the background can use the slider in the add-on’s options to change the default value of 80%. Switching to 100% for instance would paint all of the background screen black. To change the opacity users need to enter about:addons in the address bar, find the Light Switch add-on and click the Options link next to it.

Firefox users can download the restartless add-on Light Switch from the official Mozilla Add-On repository.

Monday, August 15, 2011

Mozilla Firefox 6 Final Now Available For Download

It’s not been so long that Mozilla released Firefox 5 final version for public, but today we have great news for Firefox lovers as Firefox 6 final is now available for Download on Mac, Windows and Linux via Mozilla FTP servers. It’s not available officially now but will be available anytime soon this week.


Firefox 6 Final does not bring any new changes to UI (User Interface). But though the new version bring alot of speed improvement while using the browser almost 20% faster than the previous Firefox 5.

Keep in mind that there’s a small chance that this allegedly “final” build is updated before it’s released to the public this week, yet that’s very unlikely unless major issues are found. While the welcome page still mentions “Firefox 6 Beta”, don’t be fooled, Mozilla just hasn’t updated said page yet. This latest stable Final version offers more stability and improvements than the former test builds. So, Download it and upgrade your current version of Firefox.

Sunday, August 14, 2011

HTTPS Everywhere 1.0: Very Useful Firefox Extension

I reviewed one of the first versions of HTTPS Everywhere for the Firefox web browser back in the middle of 2010. The Firefox extension, which forced https connections to a handful of supported web pages, has come a long way since then. The developers today have announced the release of HTTPS Everywhere 1.0 which includes support for over 1,000 web sites. Among the supported websites are previously supported sites like Google Search, Facebook or Wikipedia, and new services and pages like all WordPress.com blogs, Nintendo, Netflix, Dropbox or the UN website.

The extension is useful in situations where websites support both the http and https protocol without a clear distinction between the two protocols, or options to always use https when a user is connecting to the website.

HTTPS Everywhere basically ensures that https is always used when connecting to one of the supported properties. Connections that are initiated by the user via http are automatically switched over to https in this case.

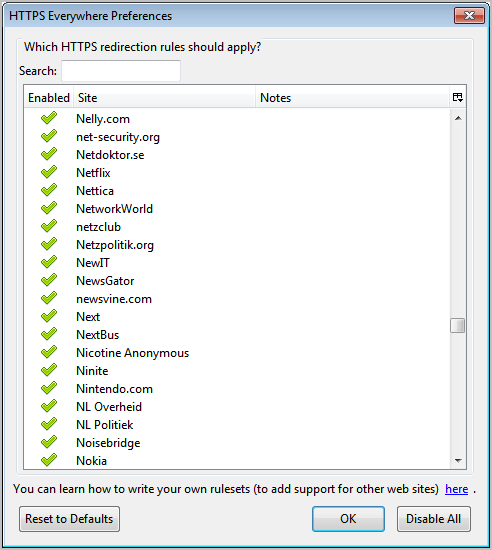
The add-on options list all supported websites and services. It offers a search to find a specific site and a switch to enable or disable the https redirection.
https-everywhere

Web users who know their way around regular expressions can even create their own rulesets to add support for websites and services that are not included in the default site listing.

New users to HTTPS Everywhere should take a look at the extensive FAQ section at the development site over at EFF.org for detailed information about the add-on and how it protects the user.

It may happen that HTTPS Everywhere breaks some part of a website, which can usually be attributed to inconsistent support for HTTPS on those sites. The only option then is to disable the rule and report the problem to the company or individual running the website.

HTTPS Everywhere can be installed directly from the EFF website. Cautious users can look at the source code of the project which is also available on the project site.

Saturday, June 11, 2011

Download Facebook Albums in Firefox


When Facebook revamped its photo uploader, it made it easier to add photos in bulk as opposed to five at a time with the old uploader. Downloading photos however remains complicated at the best. Fuschipranie is a Firefox extension that lets you download all photos in any album (your’s or a friend’s) without using a third party application.


facebook album download

To download an album, right-click it and choose Fuschipranie’s Download. A dialog box will open asking you to either specify a prefix for the image names or to use the same one as Facebook. Specifying a prefix will make it easier to search for images. Click OK to continue, specify where you want to save the images, you can create a new folder or save them to an existing one.

facebook album save

The images are downloaded to the specified path. You can download any album that is visible to you, if you frequently download Facebook albums, you can specify a default path for the extension to save pictures to from the extension options. The images are downloaded in their original format and do not have to be unzipped.
 

Saturday, May 14, 2011

How To Make Firefox 4 Look Like Version 3

If you’ve upgraded to Firefox 4, you’ve undoubtedly noticed there are several changes to the layout of the user interface. If you’re not a fan of it for whatever reason, you can make it look like Firefox 3 with an add-on and a couple of other tweaks.

sshot-2011-03-28-[01-18-58]
1. Launch Firefox 4 and install the Firefox 3 Theme for Firefox 4 add-on.
sshot-2011-03-27-[23-49-48]
2. Of course a restart will be required to complete the process.
sshot-2011-03-27-[23-55-51]
3. Right-click an empty area to the right of a tab and click on Customize.
sshot-2011-03-28-[01-23-36]
4. In the Customize Toolbar screen click on Restore Default Set.
sshot-2011-03-28-[01-24-03]
5. Right-click an area to the right of a tab again and check Menu Bar.

sshot-2011-03-28-[01-25-12]

Thursday, May 12, 2011

Mozilla Hacking || Speed up your Mozilla || Step by Step

Hello friends,
This is very easy and general article applied by any Normal Internet user.


Lets begin with a short intro of a web browser:

A web browser is an application software program used for displaying, interacting with images, text and other information located on a website.

Each web page has a unique address called a URL, or Universal Resource Locator, which tells where a particular file or information is located among all the computers that are part of the Internet.


What Happen while browsing?

Most of the Internet user suffer from their Browser when they open lots of tab(10-15),by doing so their browser speed becomes slow and they blaim their Internet Service Providers for slow speed and some times their browser also crashes.


How Browser Works?

When we open any website from our web Browser(IE,Mozilla etc.) then our Browser works as client and it requests to a webserver and in turn webserver responses(or to locate) the query of client and return the information to the client (web browser)i.e. open the site.


There are many hidden properties in web browser which ordinary user can't get easily or by googling.

So,now I am exposing some of the properties of Mozilla which helps the you to increase its speed and prevent from crashing.


You can boost up your Mozilla speed now

1) Type about:config in the address bar and click go or press Enter.

You may get a warning like that:


Hit Enter:-)


2) You get a huge table consist of many fields(preference name,value etc.) like that:


3) In the filter search bar type "network.http.pipelining".Its value field (Default) has "false" value.Now, double-click to it and set its value to "true".

Reason for it:
HTTP is the application-layer protocol that most web pages are transferred with it. In HTTP 1.1, multiple requests can be sent before any responses are received. This is known as pipelining. Pipelining reduces page loading times, but not all servers support it.


4) Go back to the filter search bar and type "network.http.pipelining.maxrequests".Double-click to it and set its value to "8".


5) In the filter search bar and again type "network.http.proxy.pipelining". Its value field (Default)has "false" value.Now, double-click to it and set its value to "true".


6)Go back to the filter search bar and type "network.dns.disableIPv6".Set this option to true by double clicking on it.


Reason for it:
In IPv6-capable DNS servers, an IPv4 address may be returned when an IPv6 address is requested. It is possible for Mozilla to recover from this misinformation, but a significant delay is introduced.


Thank you for reading :)


Feel free to ask any queries in comments.

Tuesday, May 10, 2011

How To Manually Clear Your Browsing History, Cookies, and Cache in Firefox 4

If you don’t use the Private Browsing feature in Firefox 4 all the time, from time to time you might want to clear out cookies, history, and cache. Today we’ll take a look at how to clear everything in Firefox 4.

1. To clear the History, click on the Firefox menu button and go to History then click on Clear Recent History.
sshot-2011-04-07-[20-06-26]
2. When the Clear Recent History windows comes up you have some choices. Under Details check what you want to remove from the list. Browsing and Downloads, Form and Search History, Cookies, Cache, Active Logins, and Site Preferences.
sshot-2011-04-07-[20-19-08]
3. Then you can select the time range to clear. Click the dropdown and decide the time range to clear. You can clear from the Last Hour, the day, all the way to Everything.
sshot-2011-04-07-[20-07-38]
4. After you’ve made your selections click on the Clear Now button.
sshot-2011-04-07-[20-15-38]
5. If you want Firefox to automatically clear the Cache after you’re done using it, click on the Firefox button go to Options, then click on Options again.
sshot-2011-04-07-[20-23-51]
6. Alternatively, if you hide the Toolbar menu, just hit Alt on your keyboard to bring it up. Then click on Tools then Options.
sshot-2011-04-07-[20-27-23]
7. Then under Privacy you have a few options to manage your history. You can have it never remember it and clear it every time you close out of it.
sshot-2011-04-07-[20-29-55]
8. If you don’t want it to remember anything, check Permanent Private Browsing Mode.
sshot-2011-04-07-[21-02-03]
9. To manage your cookies click the dropdown menu and select how long it keeps cookies.
sshot-2011-04-07-[21-02-38]
These are just a few examples of settings you can configure to clear you browsing History, Cache, and Cookies. In future articles we’ll be taking a deeper look into what what you can do to really lock down Firefox 4 with some add-ons and some other settings.

Monday, May 9, 2011

How To Customize IE 9 the Easy Way

If you’re new to Internet Explorer 9, you might not like the minimal interface. You can go through and make UI  and other adjustments manually, but here we’ll take a look at a free utility that will tweak it how you want easily.

1. Download and install the free utility Tweak IE9. Installation is easy following the defaults. After you go through the initial install steps, accept the EULA, then you can click on the same executable icon to launch Tweak IE9 anytime you need it.
sshot-2011-04-10-[17-29-31]
sshot-2011-04-10-[17-30-37]
sshot-2011-04-10-[17-30-56]
2. Before you run it, make sure you are closed out of IE 9. Then you’ll be able to go through and select different settings for the User Interface, Startup, Downloads, and Security. After you’ve made your selections click the Tweak IE9 Now button.
sshot-2011-04-10-[17-32-39]
sshot-2011-04-10-[17-45-59]
3. Now when you start IE 9 you’ll see the changes you selected.
sshot-2011-04-10-[17-48-09]
4. If you want to change settings just launch Tweak IE 9 again and make your selections.
sshot-2011-04-10-[17-33-31]
5. If you want IE 9 to go back to its original state, click on the Restore IE9 button. Give the utility a few moments to restore the original settings, then click on Run Internet Explorer 9.
sshot-2011-04-10-[17-48-53]
6. There you are! Everything is restored back to how it was when you originally installed IE 9.
sshot-2011-04-10-[17-49-06]
If you want to tweak different settings in IE9 without having to change each setting manually, Tweak IE9 is an easier way to make changes. This is an easy utility to use for home and expert users alike. It’s easier to use than going through the Registry to make IE9 start in full screen mode for example.

Thursday, May 5, 2011

Enable Automatic Spell Checker in Firfox : Trick

If you are a Firfox user, you must have noticed that its in-line Spell Checker doesn't work in forms, text boxes, rich text editors, etc. You need to manually right-click in the box and enable "Spell check this field" option to check the spelling.

Here is a solution for this annoying problem:

1. Type about:config in Firefox addressbar and press Enter.
2. Now type layout.spell in Filter box.
3. You'll see layout.spellcheckDefault in result.
4. Double-click on it and change its value to 2
5. Thats it. Now Firefox will check for correct spellings in every textbox, etc in webpages.

Wednesday, May 4, 2011

Hide Facebook Questions on Facebook.com : Trick

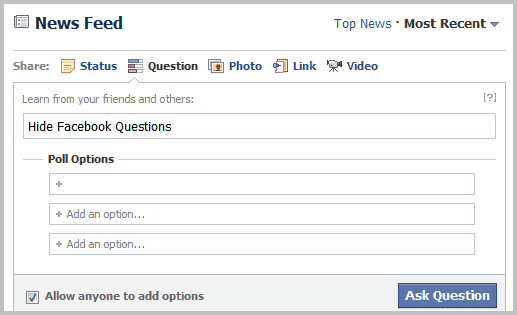
One of the more annoying things on Facebook.com as of late is a relatively new feature called Facebook Questions. It basically allows anyone on Facebook to create polls. These polls then appear not only on your own Facebook wall, but also on the news feed of your friends, which can be pretty annoying when a lot of friends create new questions regularly, or like to answer them.
Some Facebook users like to hide Facebook Questions because of that. Facebook itself has no option to do disable the polls feature, which means it is up to userscripts and browser add-ons to do just that.

hide facebook questions 

Here is a collection of tools to block polls from appearing on your Facebook news feed.

Userscripts to hide Facebook Questions

The Facebook Questions Remover userscript hides all Facebook questions occurrences on Facebook, regardless of where they appear. Google Chrome users can install the userscript right away, Firefox users need to install an extension like Greasemonkey or Scriptish first before they can install and use the userscript.
The extension removes not only the questions and polls, but also the links on Facebook to create questions and polls in first place. [link]
The script may be compatible with other browsers, including Opera and Internet Explorer.

Google Chrome extensions

hide facebook polls

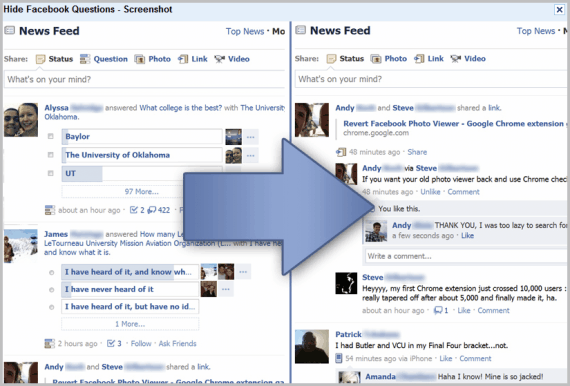
The Hide Facebook Questions Google Chrome extension hides all questions on Facebook.com, so that they do not appear in a user’s news feed nor on other pages. [link]
Alternatives: Kill Facebook Questions, also for Chrome

Firefox extensions

Facebook Purity for the Firefox web browser may look like overkill to some, as it offers a lot more than just hiding questions on Facebook. You can use it to turn Facebook upside down, make all kinds of changes. That said, it can be used to hide questions effectively everywhere on Facebook. [link]
Facebook Purity is actually available for

Friday, March 25, 2011

Bypass/Hack Adf.ly - Url shortener service

we all know, there are tons of ways for making money online. It may be sharecash, self-hosted blog or any other url shortener like Adf.ly. Adf.ly pays bucks for each advertisement seen using your shortened link. The link viewer has to wait for 5 seconds until the advertisement loads and only after 5 seconds, he can view the actual intended page. So, I have today come up with a Adf.ly hack which helps you to bypass Adf.ly advertisement. By using this Adf.ly hack, you don't need to wait for counter to go to zero. You can simply bypass Adf.ly advertisements.I have provided the link for software download .. just read on.


Bypass/Hack Adf.ly Url shortener advertisements:

 
To bypass/hack Adf.ly, you need to have Firefox browser with Greasemonkey installed. You can install Greasemonkey firefox addon, if you haven't installed yet.

1. Go to Adf.ly Hacker script page to bypass/hack Adf.ly advertisements.

2. Hit on Install and confirm the script installation in your Greasemonkey.

3. Now, whenever you'll click on any Adf.ly shortened link, you won't see any timer or counter of 5 seconds. The actual intended page will appear.

That's it friends. This was a small hack by which you can
bypass/hack Adf.ly url shortener advertisements and wait times.This hack to bypass adfly has worked perfectly for me, hope it will help you all.

Found this hack working for you??? Share your reactions in comments.

Enjoy hack to bypass Adf.ly advertisements.


Tuesday, March 15, 2011

Speed Up Browsing


When you connect to a web site your computer sends information back and forth. Some of this information deals with resolving the site name to an IP address, the stuff that TCP/IP really deals with, not words. This is DNS information and is used so that you will not need to ask for the site location each and every time you visit the site. Although Windows XP and Windows XP have a pretty efficient DNS cache, you can increase its overall performance by increasing its size. You can do this with the registry entries below:

Windows Registry Editor Version 5.00
[HKEY_LOCAL_MACHINE\SYSTEM\CurrentControlSet\Services\Dnscache\Parameters]
"CacheHashTableBucketSize"=dword:00000001
"CacheHashTableSize"=dword:00000180
"MaxCacheEntryTtlLimit"=dword:0000fa00
"MaxSOACacheEntryTtlLimit"=dword:0000012d

Make a new text file and rename it to dnscache.reg. Then copy and paste the above into it and save it. Merge it into the registry.


Monday, March 7, 2011

How To Install and Use the New Bing Bar in Internet Explorer 9

The old version of the Bing Bar was pretty useful, but took up a lot of real-estate on the IE screen. The new version is a lot more streamlined, includes easy access to data, and integrates quite nicely with IE 9.


sshot-2011-02-28-[22-14-42]

Install & Use the New Bing Bar

1. To get the new Bing Bar open IE 9 and click the Download Now button on the new Bing Bar site.
sshot-2011-02-28-[20-16-35]
2. At the bottom of IE 9 click to run the installer or download it to a convenient location on your hard drive to install later.
sshot-2011-02-28-[20-18-06]
3. When you start the installation you’ll see the Installing Bing Bar progress screen.
sshot-2011-02-28-[21-41-34]
4. It only takes about a minute to install and you’ll get some additional options to decide on. If you use Firefox you might want to uncheck the options to set Bing as your default search provider, setting MSN as your homepage, and sending anonymous info to the Bing team.
sshot-2011-02-28-[21-42-16]
5. Then at the bottom of IE 9 click the Enable button.
sshot-2011-02-28-[21-44-16]
6. Now you’ll have access to the new Bing Bar and what it offers. As you can see it’s a lot more streamlined, and it takes up less space in the browser if you hide the other menus and toolbars.
sshot-2011-02-28-[23-20-21]


Wednesday, March 2, 2011

Access the Options for Your Favorite Extensions Easier in Firefox


Would you prefer a much quicker way to access the options for your favorite extensions in Firefox? Now you can skip opening the Add-ons Manager Tab and access them directly by menu using the Extension Options Menu add-on for Firefox.

There is a toolbar button available if you prefer an even quicker method for accessing the options for extensions. Left clicking on the toolbar button displays a menu as shown here and right clicking automatically opens the Add-ons Manager Tab.


The options are simple to work with…select or deselect display methods to best suit your needs.


Note: Works with Firefox 3.7a5pre – 4.0.*
Install Extension Options Menu Add-on (Mozilla Add-ons) [via Ghacks]

Sunday, February 27, 2011

Change your Facebook News Feed Settings to see all updates

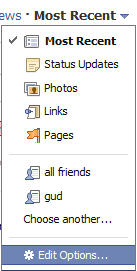
The New Facebook has a plethora of added options and tweaks as compared with the older version. The News Feed from your friends is fully customizable and you can even sort the feeds by Status Updates, Photos, Links, Page Updates or Pages. But have you noticed lately that you are seeing the updates in your news feed only from the same people? Not just that, you must have also noticed that only the same circle of your friends are commenting on your pictures and status updates while others seem to take no account of your updates? Don’t worry, its not that your friends are ignoring you outright; the default settings for the News Feed in Facebook is the culprit.


Due to the default settings for News Feed, most of your friends don’t get your updates and you don’t get theirs either. On the New Facebook, the Settings for the News Feed is set to show only posts from people who you’ve recently interacted with or interacted the most with. This limits your so called “most interacting peers” to the ones who you interacting frequently with just a few days or weeks before switching to the new profile. So, your friends who interacted with you within those weeks or the ones on whose posts you commented on only fall in the list of the people you interact with the most. Same is the case for the like pages; i.e. the pages that you were commenting on.

Same is the case for your friends; if they weren’t commenting on your posts or if you weren’t commenting on theirs in the last few weeks before switching to the new profile, they aren’t seeing your updates lately.

Facebook Newsfeed settings

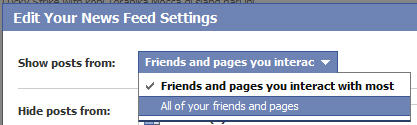
But you can modify the settings for the News Feed and you’ll start seeing the updates from your friends whom you haven’t been hearing from lately. Scroll all the way down to the bottom of your News Feed and click on “Edit Options”. You can also get the options box by clicking on “Edit Options” from the “Most Recent” dropdown at the top of your News feed. On the “Show Posts From” dropdown, you’ll see that the option “Friends and pages you have interacted with most” is selected by default. Instead, choose the next option i.e. All of your friends and Updates and click on the Save button. This will do the trick and the updates from all your friends will start appearing on your News Feed.

Also ask your friends to do this or they won’t be seeing your updates if you haven’t interacted with them lately.

Monday, February 21, 2011

INVISIBLE PROFILE

Wanna disappear completely? Be like a ghost - Invisible.


For making your orkut  profile  invisible follow the steps:
1) Click on edit profile
2) Copy the code given in the following box:

(The following box may seem to be empty, but it do contain some magical invisible powder, just select the contents and copy it)
Copy any ONE of the three:


FOR INTERNET EXPLORER


FOR
FIREFOX


Works for BOTH but displays  a _ in when the profile name is used as a hyperlink


3) Paste the above copied magical code in the First Name and Last Name text boxes on your "edit profile" page.

4) Click on Update

5) Visit THIS page.

6) Right click HERE and save the picture on your desktop by clicking on 'Save Link As' from the drop down menu.

7) Now, on the page you opened in the 4th step, browse the just downloaded picture and click on 'Upload photo'.

That's all.

Thursday, February 17, 2011

Better Access To Downloads List In Firefox : Tip

Computer users who want to access a list of recent Firefox downloads need to open the web browser to access that list providing that the download records are stored and not deleted on exit or user request. Downloads are listed under Tools > Downloads or by using the keyboard shortcut Ctrl-j.

Firefox Download View is an alternative for the Windows operating system. The free portable software lists all recent Firefox downloads after launch in its interface. The main advantage of using the software is that it offers better accessibility and processing options.


Each download is listed with its file name, website address that it was downloaded from, the full path on the local drive where it was saved to, the referrer if available, mime type of the file, file size, download duration and average download speed.

Especially a look at the average download speed could provide valuable information about the speed of the Internet connection over time. The average download speed is

Wednesday, February 16, 2011

How to set default locale in Firefox

Many websites seek your location to give you the appropriate page version in your language. For example, if you open Google from Germany, you’ll get Google in Deutsch language with the domain as http://google.de. But lets say you are in another country but want to use Google in your native language. Then you wouldn’t like to do it by choosing your language from language settings but rather get the appropriate page automatically. You can do this by setting your default locale on Firefox.

Set default locale in Firefox
If you set your default locale in Firefox, any website that filters pages based on your location throws you the page matching the language set in your default locale. To do this, open up a new Tab in Firefox and go to “about:config” from the address bar. Don’t get scared by the prompt that appears next. You will now see a list of all the preferences in Firefox.

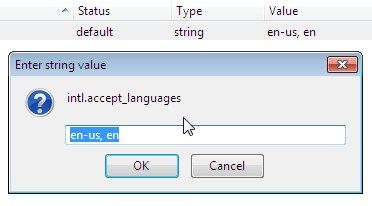
Now locate, “intl.accept_languages” using the Filter bar at the top. Right click on it and select Modify. You’ll see two parameters separated by a comma which is like this “en-us, en”. Change the first entry as per your language and location. For example, enter “da-dk”  before the comma for Danish Language.
You can also do this by modifying another preference “general.useragent.locale” from about:config in Mozilla Firefox.

This trick will help you set your preferred locale. Upon doing this, your native language will be automatically recognized by concerned websites.