twitter
    Find out what I'm doing, Follow Me :)
Showing posts with label Master Of All Hackig Warez. Show all posts

Wednesday, June 27, 2012

A look inLeaside Leap Motion, the 3D gesture control that's like Kinect on steroids


Leap Motion's not the household name Kinect is, but it should be — the company's motion-tracking system is more powerful, more accurate, smaller, cheaper, and just more impressive. Leap CTO David Holz came by the Verge's New York offices to give us a demo of the company's upcoming product (called The Leap), and suffice to say we're only begrudgingly returning to our mice and keyboards.

 The Leap uses a number of camera sensors to map out a workspace of sorts — it's a 3D space in which you operate as you normally would, with almost none of the Kinect's angle and distance restrictions. Currently the Leap uses VGA camera sensors, and the workspace is about three cubic feet; Holz told us that bigger, better sensors are the only thing required to make that number more like thirty feet, or three hundred. Leap's device tracks all movement inside its force field, and is remarkably accurate, down to 0.01mm. It tracks your fingers individually, and knows the difference between your fingers and the pencil you're holding between two of them.

Holz showed off a number of different use cases for Leap Motion's technology. The simplest thing it can do is simulate a touch screen, so you can interact with any display as if it were touch-enabled — we were slicing pineapples in Fruit Ninja in seconds, without a moment of extra development or additional software.
Developers that do take advantage of the Leap's SDK will be able to do much more, however, and the possibilities appear to be limited only by your imagination. All kinds of different apps are being developed: some could improving remote surgery, others allow easier navigation through complex models and data, and others might put you square in the middle of a first-person shooter. It's like holding the Mario Kart steering wheel, but on a whole new level.


 ather than mapping particular gestures (cross your arms to close the app, draw a circle to open a new window), Holz said developers are being encouraged to provide constant dynamic feedback. No one needed to be taught what pinch-to-zoom meant — it's the natural thing to try and do on a touchscreen, and as soon as you start pinching or spreading it becomes clear what happens. That's the paradigm for the Leap, Holz says: you should always be able to just do something, and the app or device should respond.

 Leap Motion's plans are huge (Holz mentioned a few times wanting to totally upend traditional computing methods) but the company's playing its cards close. The Leap will cost $70 when it's released — sometime between December and February — and Leap Motion is also working with OEMs to embed its technology into devices. The Leap is about the size of a USB drive, but Holz says it could easily be no larger than a dime, so adding it to a laptop or tablet shouldn't be difficult.

Developers are apparently beating down the company's doors for access to the technology — Holz said thousands of Leaps will be given away in the next few months, before it's released to the public. That's no surprise: after only a few minutes of cutting fruit, scrolling around maps and webpages, and navigating through huge 3D spaces, all without ever touching a thing, we're pretty sure we've seen the next big thing in computing.
The natural comparison to any motion control is Minority Report, an imagined future everyone seems to desperately want to come true. We asked Holz about the comparison, and if Leap Motion's technology meant we'd all have Tom Cruise's awesome PreCrime dashboard in the future.
"No," he told us. "It'll be even better."

Saturday, March 3, 2012

BackTrack 5 R2 released with new Kernel, added new tools


BackTrack 5 R2 has been released. BackTrack is a popular operating system which is used by hackers and security reseachers. This operating system comes with all the penetration testing and hacking tools so it gives an advantage to security researcher.
This new updated version added a new kernel with many bug fixes. It also comes with 42 new tools which is a good news for security researchers. his release have included Metasploit 4.2.0 Community Edition, version 3.0 of the Social Engineer Toolkit, BeEF 0.4.3.2, and many other tool upgrades.
Backtrack also following new tools to R2:

  • arduino
  • bluelog
  • bt-audit
  • dirb
  • dnschef
  • dpscan
  • easy-creds
  • extundelete
  • findmyhash
  • golismero
  • goofile
  • hashcat-gui
  • hash-identifier
  • hexorbase
  • horst
  • hotpatch
  • joomscan
  • killerbee
  • libhijack
  • magictree
  • nipper-ng
  • patator
  • pipal
  • pyrit
  • reaver
  • rebind
  • rec-studio
  • redfang
  • se-toolkit
  • sqlsus
  • sslyze
  • sucrack
  • thc-ssl-dos
  • tlssled
  • uniscan
  • vega
  • watobo
  • wcex
  • wol-e
  • xspy

Friday, February 3, 2012

Display a banner each time Windows boots

  1. Start -> Run
  2. Type regedit
  3. Go to the key HKEY_LOCAL_MACHINE\SOFTWARE\Microsoft\Windows\CurrentVersion\WinLogon
  4. Create a new string value in the right pane named LegalNoticeCaption and enter the value that you want to see in the menubar
  5. Create a new string value and name it LegalNoticeText. Modify it and insert the message you want to display each time Windows boots.

Bring Back Default IE logo

Your browser logo shows something other than the IE logo. Maybe you have installed your ISP software and you have a different logo on the top right. How do you remove it?
  1. Close all browser windows
  2. Start -> Run
  3. Type RunDLL32.EXE IEdkcs32.dll,Clear
  4. Click on OK, and start Internet Explorer. You should find the old spinning IE logo.

Shutting down Windows the fastest way

  1. Start -> Run
  2. Type rundll.exe user.exe,exitwindows

Sunday, January 1, 2012

iOS 5.0.1 up and running

Good News for all iOS 5.0.1 has been jailbroken successfully and that too untethered.....
In this guide i will show you exactly how to do this.


Lets initiate the process.....


REQUIREMENTS
  1. iOS 5.0.1 ipsw file (google it and you'll find many there).
  2. Redsnow 0.9.10 b3 (b3 is very important b1 and b2 conatain lots of bugs again google will help).
  3. Requires iTunes 10.5 or later.
  4. iDevice (iPhone above 3G would be required because of speed 3G will hang a lot)
So we are done with the requirements so now this will be it. Here are the Steps......

  1. First of all put your iDevice in DFU mode. You can do it in redsnow itself.
    • Start rednsow -> Click Extras -> Pwned DFU mode -> Follow the instructions on the screen
    • For users who want to know about PWNED DFU mode- it is a deep DFU mode where the device accepts the iPhone for update without checking for many things like custom firmware. For more information just mail me at charanjit@borntohack.in
  2. After getting into DFU mode screen must be black without anything on it. Then Start iTunes and hit shift+restore (for Windows users) or alt+restore (for Mac Users) and then browse to the ipsw file that you download of iOS 5.0.1
  3. After all the things done your iPhone must come to life with the iPhone setup on the screen. You can do it but i recommend to jailbreak it first.
  4. To jailbreak the device open redsnow 0.9.10 b3 again.
    • goto extras->select ipsw -> browse to the download iOS 5.0.1 ipsw-> hit back.
    • Now you should be on the screen where you selected Extras but this time select jailbreak.
    • Follow the instructions on the screen when you hit next on redsnow
  5. Now you have a jailbroken device in your hand.......  You can try Appsync 5.0+ if you want to install cracked apps just add the repository http://cydia.hackulo.us....
    While running cydia keep one thing in mind donot let the the screen get locked as update stops. For more information read step 6.


    (iPod, iPad and iPhone(who have official carrier) people stop here )

  6. Now for those who want to unlock their iPhone for unofficial carriers just go to cydia and wait for the updating to finish ( you can see cydia updating on the top when the black bar is there and update is running. Here donot let the the screen get locked as update stops). Now install ultrasnow 1.2.5. it only supports a few basebands read my previous posts.


    Now you are done with the device go on have fun!!!!!!
    If any problem occurs the mail me at charanjit@borntohack.in OR just comment here......

Thursday, December 22, 2011

time for iOS 5.0.1

If you depend upon an unlock (you are not on the official carrier) and you own an iPhone 3GS or 4 then this is the time for you to have experience of iOS 5.0.1

The most awaited ultrasnow 1.2.5 (to unlock the iPhone 4 and 3GS on iOS 5.0.1) is out now. Just simply update to iOS 5.0.1 and go to cydia then install ultrasnow (make sure while installing ultrasnow your sim is out of the sim tray) reboot the phone and while rebooting put the sim back in and then wait it may take upto 3 minutes so be patient!!!!!

Supported Basebands


  • 01.59.00
  • 04.26.08
  • 05.11.07
  • 05.12.01
  • 05.13.04
  • 06.15.00

Note: the repository for ultrasnow is http://repo666.ultrasn0w.com  (yes it is a zero in ultrasn0w)
          add this repo on the iPhone (if you dont know please refer to some of the earlier posts).

So it is just a minor update for unlockable basebands to unlock the basebands that were unlockable earlier as well.

Enjoy the iOS experience.

Any comments or suggestions or any query please drop in at charanjit@borntohack.in.

Wednesday, December 21, 2011

Find Out the Time you have Worked on a Document or a Presentation


One of the things most writers want to know is how much time they’re spending on writing  a piece of text. If you use Microsoft Word for all your writing needs, you’re in luck, because it is really easy to find out the time consumed on the editing of a Word document.

When you start working on a new Word document, a timer starts, and once you save the document, the time consumed thus far is saved as the ‘total editing time’. You continue to work on the document, and save it again, and the time elapsed since the last save is added to the total editing time. However, if you exit without saving the document, the time since the last save won’t be added to the total time. In our testing, this feature was found to be present in Office ’03, 07’, and ‘10.

So when you’re working on the document and want to check the total time consumed so far (since the beginning), click the Office logo, navigate to Prepare, and click Properties.


In the properties pane, click Document Properties>Advanced Properties.


In the properties window, click

Monday, December 19, 2011

How To Store More Files On Dropbox Than Your Permitted Sapce

I have been using the cloud storage and file synchronization service Dropbox more frequently lately, and its is pretty awesome.

You probably know that Dropbox keeps track of all file changes automatically, with options to restore a previous version of the file. While looking at that I noticed that it is possible to restore deleted files as well. I first thought about writing an article about that as it is a pretty interesting feature. Especially so for users who have accidentally deleted files, and users who want to make sure that deleted files cannot be recovered. A recoverable copy on the Dropbox server is the last thing those users would want.

While I was investigating the issue I noticed that Dropbox subtracts the file size of deleted files from the available ratio. This basically means that you get additional upload space even though the files are still stored on Dropbox. Remember, deleted files do not get deleted right away.

The Dropbox FAQ states that deleted files and old file versions get saved for 30 days by the service before they are removed.

I also tested if it is possible to restore deleted files to get beyond the allowed quota of an account. Turned out that this is actually possible as well. Here is how it is done in detail.

Go to the Dropbox website and log into your account there. Switch over to Files to see all your files currently stored on Dropbox. Activate the show deleted files button to display deleted files and folders in the file listing. These are highlighted in grey, and the size says deleted instead of the real file size.


The idea is this. You upload files as usually to Dropbox. Once you come near the quote you start deleting files. Don’t worry, the files are still there. Your quote drops again and you can upload more files to Dropbox. I’m not sure if there is a limit or if you could theoretically go on forever. You can later on restore deleted files which can move you over your Dropbox quote.

You basically have two options to go upload more files to Dropbox than your quote allows.

Delete files temporarily to reduce the storage quota
Recover the files again at a later time to store files over the quota

Please note that deleted files won’t be synchronized, and that no new file versions will be saved by Dropbox. Have other Dropbox tips to share? Let me know in the comments.

Hide All Google Chrome Tabs With A Single Click


If you are working in a multi-user office or in a room that people may enter unannounced, you’d probably like an option to hide what’s shown on the screen when that happens. Maybe you like buying gifts for someone online, like to surf on a site that you are not allowed to access, or do not want your office colleagues to find out that you are into Britney Spears. Whatever it is, a Panic Button application can be the solution.
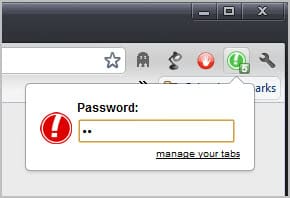
panic buttonA panic button or boss key application performs one or multiple actions when the button is activated. This usually includes hiding a window, but sometimes other things such as muting the volume.
The Google Chrome Extension PanicButton adds the functionality to the Chrome browser. It basically allows you to hide all open Chrome tabs with a single click.
Here is how it works in detail. The extension adds a single button to the Chrome address bar upon installation. A left-click on the button hides all open tabs and displays a single blank tab instead in the browser interface. A second left-click loads the websites again so that you can continue using them. The extension saves the open tabs to bookmarks. This means that you may lose whatever you have been working on before you have clicked on the button.
A green icon with the number of saved tabs attached to it is displayed when the panic button has been activated.
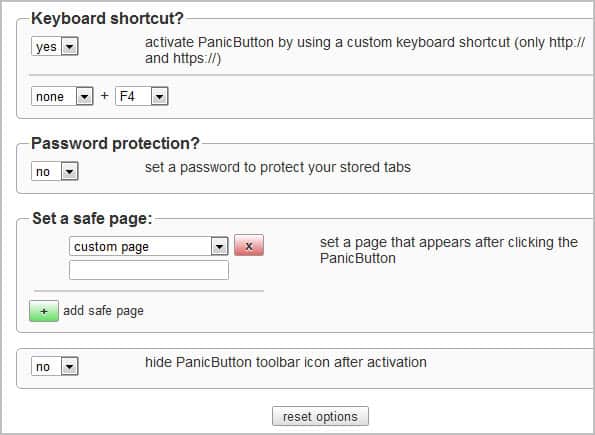
New users should take a look at the options of the extension by right-clicking on the icon and selecting options from the context menu.
Here it is possible to set a password to protect tabs from being restored. Anyone could theoretically click on the button to recover tabs otherwise.
You can furthermore change the default keyboard shortcut from F4 to another combination. Please note that you can only use the shortcut on http or https pages. It wont work on blank or internal pages.
panic button options
Safe pages, that is pages that are displayed when the panic button is activated, can be configured in the options as well. You can select to display new tab, empty or custom pages. Custom pages are websites that you need to enter. These are then loaded whenever the panic button is activated in the browser.
The hide panic button option finally hides the button once it has been activated. This removes the indication from Chrome’s toolbar.
Chrome users can download the PanicButton extension from the Google Chrome Extension repository.

Tuesday, December 6, 2011

update iDevice to iOS 5.0 with iPad Baseband

The new and revolutionary iOS 5.0 is here and here is how to update and jailbreak and unlock the device running on iOS 5.0

The hardware / software you would require:-
1) iDevice
2) iOS 5.0 firmware(link).
3) redsnow (link here to download for mac and download for windows)


instructions for Windows Users:-

  • Open Rednsow and then press extras (turn off your device before that) and go in Pwned DFU mode by following the instructions on the screen.
  • Once in Pwned DFU mode, Open iTunes and press shift+restore and select the iOS 5.0 firmware that you just downloaded.
  • Restore the iPhone. (if there is any error mail me the error code, i will mail you the procedure to remove it.)  email-id- charanjit@borntohack.in
  • Once restored the firmware then you would want to skip setup because it asks for the Sim (if you are not on the official supported carriers) open redsnow once again.
  • in Redsnow go to Extras->Select ipsw-> back-> jailbreak-> check install cydia->(turn off the device)next-> follow the steps on the screen and then the device will reboot.
  • Now go ahead and setup the device it will not ask for the Sim and Cydia would be installed.
  • Now in Cydia install ultrasnow 1.2.4 and unlock the iDevice and enjoy any Sim.


instructions for Mac Users:-

  • Open Rednsow and then press extras (turn off your device before that) and go in Pwned DFU mode by following the instructions on the screen.
  • Once in Pwned DFU mode, Open iTunes and press alt+restore and select the iOS 5.0 firmware that you just downloaded.
  • Restore the iPhone. (if there is any error mail me the error code, i will mail you the procedure to remove it.)  email-id- charanjit@borntohack.in
  • Once restored the firmware then you would want to skip setup because it asks for the Sim (if you are not on the official supported carriers) open redsnow once again.
  • in Redsnow go to Extras->Select ipsw-> back-> jailbreak-> check install cydia->(turn off the device)next-> follow the steps on the screen and then the device will reboot.
  • Now go ahead and setup the device it will not ask for the Sim and Cydia would be installed.
  • Now in Cydia install ultrasnow 1.2.4 and unlock the iDevice and enjoy any Sim.


If you are on iPad or iPod then you can skip off the last step of installing ultrasnow as this will not be required..........

Tuesday, November 29, 2011

How to hide your important data from other users?

Normally when you need to secure your important data from other users, then your first choice is to burn it on CD or put it to removable drive instead of hard drive. But imagine if your data size is more than 100 GB then it is not easy to burn it on CD. No worry, you can save your full drive from other users access using this trick. Check out InfoSec Institute for IT courses including computer forensics boot camp training

Perform the given steps to hide your system data partition:

  • To enable this feature, you will need to be logged into your computer with administrative rights.

  • First click on Start button to open "Run" and type "CMD" (without the quotes) then press Ok button to open Command Prompt.

Now type diskpart on the blinking cursor and wait for 5 seconds to appear diskpart> utility.

To show the list of volume, type list volume command after the diskpart> prompt, this command will show you all system drives detail.

Now first select the volume that you want to hide, for example,

if you need to hide F drive then first type select volume 2 (in this case) and press enter button.

After loading volume, type remove letter F (in this case) to hide F drive.

Now exit from command prompt and open My Computer to verify drives.

But next time, when you want to unhide the D drive, just run assign drive F command after loading volume 2.


Sunday, November 20, 2011

How to Secure a Wireless Network from Hackers?

The reason we secure a wireless network is to stop people from using the services of our network who don't have permission to utilize them. It is harder to secure a wireless network from hackers as compared to a classic wired network. This is due to the fact that a wireless network can be accessed anywhere inside the range of its antenna.

In order to secure a wireless network from hackers, we should take proper steps to save ourselves against security issues. If you don't secure a wireless network from hackers, you might end up without its service. The consequence might also include the utilization of our network to attack further networks. To secure a wireless network from hackers, you should follow these simple wireless networking tips:

1. Strategic antenna placement:

The first thing you have to do is to position the access point's antenna in a place which restricts the range of its signal to go further than the required area. You should not put the antenna close to a window because glass can't obstruct its signals. Place it in a central location of the building.

2.Use WEP:

WEP stands for Wireless encryption protocol. It's a customary technique for encrypting traffic on a wireless network. You should never skip it as that will allow hackers to get instant access to the traffic over a wireless network.

3. Change the SSID, disable the broadcast of SSID:

SSID stands for service set identifier. It is the recognition thread utilized by the wireless access point due to which the customers are capable of starting connections. For every wireless access point arranged, select an exclusive as well as unique SSID. Also, if it's attainable, hold back the broadcast of the SSID out over the antenna. It won\t appear in the listing of offered networks, while being able to provide services as usual.


4. Disable DHCP:

By doing this, the hackers will have to decode the TCP/IP parameters, subnet mask as well as the IP address in order to hack your wireless network.


5. Disable or modify SNMP settings:

Change the private as well as public community settings of SNMP. You can also just disable it. Otherwise the hackers will be able to utilize SNMP to get significant info regarding your wireless network.


6. Utilize access lists:

For additional security of your wireless network, and if your access point support this feature, employ an access list. An access list lets us determine precisely which machinery is permitted to attach to an access point. The access points which include the access list can employ trivial file transfer protocol (TFTP) now and then in order to download modernized lists to steer clear of hackers.

Thursday, October 27, 2011

Install iOS 5 on iPhone

iOS 5 comes up with the whole new baseband version so upgrading via iTunes would not be a good idea for people who rely on unlocking of the device via ultrasnow (means using the not supported carriers as well). Presently only tethered jailbreak of all the devices on iOS 5 is available (menas you have to connect your device with the PC and boot with ibooty it will only then boot). So if you are ready to do this continue reading otherwise you can read it for knowledge of the same.

Ok so letz get started. So firstly you will need some softwares:-
  1. iOS 5 ipsw file get it from here.
  2. snowbreeze for iOS 5 get it from here.
  3. redsnow for iOS 5 get it from here. for Windows and for mac.
first of all start snowbreeze and then put the ipsw file of iOS 5 into snowbreeze (by drag and drop or by locating the file) then build the ipsw. Snowbreeze will save your modified file on the desktop.
Now open iTunes and then keep pressing shift on the keyboard and then press restore button in iTunes and locate the file which is saved on desktop (snowbreeze modified). Software will install and then run redsnow. Now jailbreak as per instruction on redsnow and there it is ready to go ....

Sunday, October 23, 2011

iOS 5 comes to Born To Hack!!!!

iOS 5 the most advanced OS is now on born to hack!!!!!

major Changes in iOS:-

1) Notification Center
2) Reminders App
3) inproved Folder opening.
4) on device software update.
5)wifi sync
6)custom vibrations (on call) and also user can make vibrations
7)Assistive touch
8) twitter integration


and much more......

follow us to know about the installation and jailbreak of iOS5

Wednesday, October 12, 2011

You can now use iCloud: Its free

Apple devices can be addictive: People buy one tiny iPod, fall in love, and end up with three or four other Apple products. Now if only they could see all their data on all those devices simultaneously.

Starting today, they can.


Thanks to iCloud, the iPhone, iPad and iPod Touch all have the same document with no work on the user’s part.

ICloud is designed to store and replicate documents, music, apps and 1,000 photos on PCs, the iPhone, iPod Touch and iPad. It also syncs contacts, calendars and email so all your machines and devices have the same data and content. It will back up five gigabytes of data, but certain types aren’t counted against that total. The best part: It’s free.

I’ve been testing iCloud’s sync ability between a MacBook Pro, iPhone 4S and iPad 3G. I also accessed and added content using iCloud.com. At first, I ran into a few hiccups with syncing photos, but an Apple spokesman explained that the company’s servers were occasionally down while they were being prepared for Wednesday’s iCloud launch. After that, iCloud worked without a hitch—well enough that I stopped thinking about which device held what since they were all updated with the same content.

On the downside, iCloud doesn’t automatically sync videos to other devices. In WiFi, it won’t sync edited photos if edits are made on a device after its camera app is closed. (This includes removing red eye, cropping and auto-enhancing images.) And document sharing on iCloud is focused on sharing with oneself, not with other people, unlike the document-sharing solutions from Google and Microsoft.

I found iCloud’s most useful feature to be Photo Stream, which automatically sends images captured by an iPhone, iPad and iPod Touch up to iCloud and replicates them on all other iCloud devices, one by one. Watching these photos pop onto the screen of my computer, iPad or iPhone was nothing short of delightful.

Photos are pushed via iCloud to the Mac and PC in their full resolution and sent to the iPad, iPod Touch or iPhone in a resolution that’s optimized for those displays.


Photo Stream sends images captured by mobile devices, such as the iPhone and iPad, up to iCloud and replicates them on all other iCloud devices,

By default, any images imported to a PC or Mac are automatically sent into Photo Stream, though this setting can be turned off. Devices need only be powered on and in WiFi to receive images from Photo Stream.

Each photo remains in Photo Stream for

Friday, October 7, 2011

Steve Jobs, father of personal computing, passed away


Steve Jobs died yesterday, aged 56, succumbing to the pancreatic cancer he'd been battling since 2004. The co-founder and chief architect of one of the biggest companies in the world, Apple Inc., Jobs was a visionary who had a large hand in shaping the world we live in today, giving us everything from the personal computer, to digital music distribution and the quintessential smartphone.
Apart from the words (seen below) from Apple's Board of Directors, newly appointed Apple CEO - Tim Cook, and Bill Gates, tributes from the common man are flooding the internet, with people also flocking to Apple's stores and offices to leave mementos, flowers, pictures and post-its in memoriam to the enigmatic futurist.
A creative genius, Steve Jobs' zealful personality was one of the principal driving forces behind personal computing, one of the folks "crazy enough" to change the world, and the sad news of his demise has had a profound effect on all of us - regardless of any of our opinions about Apple and its products. R.I.P Steve Jobs.
Tim Cook in a letter to Apple employees
Team,
I have some very sad news to share with all of you. Steve passed away earlier today.
Apple has lost a visionary and creative genius, and the world has lost an amazing
human being. Those of us who have been fortunate enough to know and work with Steve have lost a dear friend and an inspiring mentor. Steve leaves behind a company that only he could have built, and his spirit will forever be the foundation of Apple.
We are planning a celebration of Steve’s extraordinary life for Apple employees that will take place soon. If you would like to share your thoughts, memories and condolences in the interim, you can simply email rememberingsteve@apple.com.
No words can adequately express our sadness at Steve’s death or our gratitude for the opportunity to work with him. We will honor his memory by dedicating ourselves to continuing the work he loved so much.
Tim
Bill Gates
I'm truly saddened to learn of Steve Jobs' death. Melinda and I extend our sincere condolences to his family and friends, and to everyone Steve has touched through his work.
Steve and I first met nearly 30 years ago, and have been colleagues, competitors and

Tuesday, October 4, 2011

How to disable Facebook Timeline

This is for the people who didn't like the new Facebook Timeline and want got back to the old view.


Follow the under given steps:


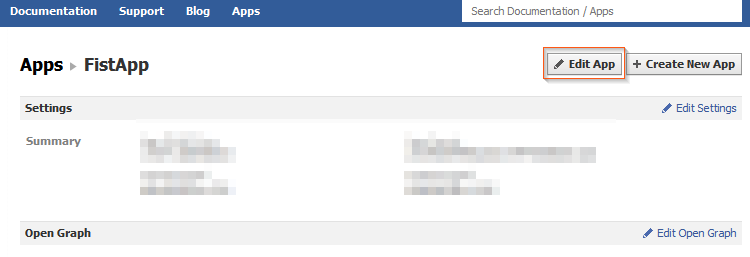
1.  Head over the Facebook developer web page, log in and click on Edit App.

Disable Facebook Timeline - Edit App

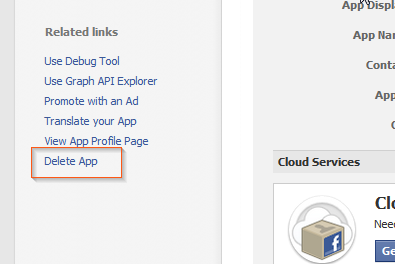
2.  On the left side of the screen, click Delete App.

Disable Facebook Timeline - Delete App

3.  In the dialog box, click

Saturday, October 1, 2011

Reports: Microsoft Anti-Virus Erasing Google Chrome

Mighty funny timing, Microsoft. Reports say that Google’s Chrome browser was threatening to overtake Firefox in the coming months thanks to soaring usage rates caused, in large part, by FF and IE defectors. Then, this morning, Internet forums are awash with rage because a new update to Microsoft’s Security Essentials and ForeFront AV software began calling Chrome a Trojan and erasing it from users machines. Coincidence? Yeah, it probably is. But that still doesn’t change the fact that users are pissed.

Both ZDNet and The Register are reporting that they’ve received numerous complaints about the critical false positive. The AV programs are identifying Chrome as part of the ZeuS Trojan, and users who try to reinstall the browser are finding that the antivirus program won’t let them, citing “PWS:Win32/Zbot” as a severe threat. Register readers are reporting that the beta version of Chrome isn’t affected, nor are browsers that are configured to not send Google any information. Nobody’s saying anything official at the moment – both Google and Microsoft have been mum on the matter.

So, has any of you been affected by the bug? Chime in with your experiences in the comments! I've got Chrome and MSE installed on my laptop, and nothing fishy has gone on yet.

How to Enable the Hidden Windows 7 Admin Account

Lead Image

Imagine you have a Windows PC with a single user account, and you just lost your password. Here’s how to enable the hidden Administrator account with nothing more than the install CD and some registry hacking magic so you can reset your password.
Normally if you wanted to enable the hidden administrator account from within Windows, you’d need access to an Administrator mode command prompt, but that won’t work if you don’t have access, right? This is a great way to quickly enable the hidden admin account so you can reset the password on your main account.
Note: This will require editing the registry which is risky. Proceed only if you know what you are doing and at your own risk.

Enabling the Hidden Administrator Account

Now prepare your Windows 7/Vista DVD and restart the computer with the DVD in the DVD Drive—you’ll want to boot from the DVD so you may need to change the boot order in the BIOS. Depending on your system you will need to press Del, F2, or F12.
After you’ve successfully booted from the DVD you’ll be presented with the language setting of the Windows setup. Click next.

Language Sellection

In the next screen click “Repair your computer” from the bottom left corner of the window. Now the setup will search for Windows installations then display them, choose the Windows you want and click next. The setup may try to search for problems and may ask you if you want to restore your computer, just click no. Finally you’ll arrive at