twitter
    Find out what I'm doing, Follow Me :)
Showing posts with label Windows 7. Show all posts

Wednesday, May 15, 2013

New 25 GPU Monster Devours Passwords In Seconds


ditor’s note: I’ve updated the article with some new (and in some cases) clarifying detail from Jeremi. I’ve left changes in where they were made. The biggest changes: 1) an updated link to slides 2) clarifying that VCL refers to Virtual OpenCL and 3)  that the quote regarding 14char passwords falling in 6 minutes was for LM encrypted – not NTLM encrypted passwords. Long (8 char) NTLM passwords would take much longer…around 5.5 hours.  
There needs to be some kind of Moore’s law analog to capture the tremendous advances in the speed of password cracking operations. Just within the last five years, there’s been an explosion in innovation in this ancient art, as researchers have realized that they can harness specialized silicon and cloud based computing pools to quickly and efficiently break passwords.
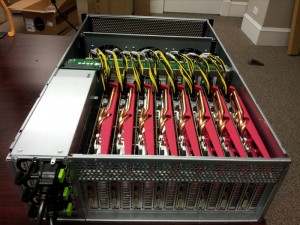
A presentation at the Passwords^12 Conference in Oslo, Norway (slidesavailable here - PDF), has moved the goalposts, again. Speaking on Monday, researcher Jeremi Gosney(a.k.a epixoip) demonstrated a rig that leveraged the Open Computing Language (OpenCL) framework and a technology known as Virtual OpenCL 
Open Cluster (VCL) to run the HashCat password cracking  program across a cluster of five, 4U servers equipped with 25 AMD Radeon GPUs and communicating at  10 Gbps 
and 20 Gbps over  Infiniband switched fabric.
Gosney’s system elevates password cracking to the next level, and effectively renders even the strongest passwords protected with weaker encryption algorithms, like Microsoft’s LM and NTLM, obsolete.
In a test, the researcher’s system was able to churn through 348 billion NTLM password hashes per second. That renders even the most secure password vulnerable to compute-intensive brute force and wordlist (or dictionary) attacks. A 14 character Windows XP password hashed using LM NTLM (NT Lan Manager), for example, would fall in just six minutes, said Per Thorsheim, organizer of the Passwords^12 Conference.
[Note of clarification from Jeremi: "LM Is what is used on Win XP, and  LM converts all lowercase chars to uppercase, is at most 14 chars long, and splits the password into two 7 char strings before hashing -- so we only have to crack 69^7 combinations at most for LM. At 20 G/s we can get through that in about 6 minutes. With 348 billion NTLM per second, this means we could rip through any 8 character password (95^8 combinations) in 5.5 hours." ]
“Passwords on Windows XP? Not good enough anymore,” Thorsheim said.
Tools like Gosney’s GPU cluster aren’t suited for an “online” attack scenario against a live system. Rather, they’re used in “offline” attacks against collections of leaked or stolen passwords that were stored in encrypted form, Thorsheim said. In that situation, attackers aren’t limited to a set number of password attempts – hardwareand software limitations are all that matter.
The clustered GPUs clocked impressive speeds against more sturdy hashing algorithms as well, including MD5 (180 billion attempts per second, 63 billion/second for SHA1 and 20 billion/second for passwords hashed using the LM algorithm. So called “slow hash” algorithms fared better. The bcrypt (05) and sha512crypt permitted 71,000 and 364,000 per second, respectively.


Monday, April 29, 2013

Fix USB device not recognized error


The most weird error which Windows user sometimes get is USB device not recognized error. In this condition doesn’t matter which USB device you insert in your computer, Windows will not detect it. You change the port and still error remains the same!

Yesterday while working on my PC my all the devices suddenly got disconnected and when I removed them and inserted them back I got USB device not recognized error in Windows 7, it had also appeared Windows XP earlier. I tried to change the ports but nothing happened. I went into Windows registry and tried to tweak settings there but no success. I read somewhere that in this condition one should reinstall device drivers and then try again, following the same I reinstalled device driver of my USB modem and then pluged it back but I was still getting USB device not recognized error.

I searched on Google about the solution and then I was recommended to uninstall device from Device Manager, I did the same and restarted PC but error still didn’t got away.

After getting tired of all this, I finally got the solution and it’s the easiest solution which I every came too, you must be too amazed to know about super simple solution to fix USB device not recognized error in Windows.

To fix USB device not recognized error just unplug your computer from main power board and then plug back the computer to power supply. You must be thinking that by Unplug I mean turning off the computer ? Well, unplug here doesn’t mean turning off the computer instead you have to first shutdown your computer then remove power cord from power supply and keep it in condition for few minutes and then plug it back and restart your computer and plug in your USB device and it will start working again.

Wondering How did it work ?
Since your computer(or laptop) is connected with UPS(or battery), it has small amount of power going in it even though it is off. Sometimes some circuitry error may disable some functions such as USB recognizing and you get USB device not recognized error or similar feature. Unplugging turn offs the power supply and your computer gets a ‘chance’ to load all the drivers again and there you go, the problem get’s fixed!

Thursday, December 29, 2011

Virus protection tips: from basic to advanced level

Computer viruses or spam ware can steal your personal information, cause destruction with normal computer operations and attract new spam ware. Even, they can shut down your computer’s hard drive. Protecting your computer from viruses is critical for browsing success and safe computing. There are some virus protection tips for you. Millions of computer programmers are developing virus programs for your computer.

Start up with firewalls
Your computer comes with security system e.g. some operating systems provide security firewalls for the protection of system. When you start to use computer for the very first time, you have to register your software from its provider. You should make sure the proper functioning of your computer software. This will ensure the basic protection of your computer.

You can’t rely on a firewall
Your computer’s basic security can’t protect it from new emerging spam ware. Some software also provides virus protection tips to you for the additional computer protection. They stop the operations of harmful programs, but, they need regular updates. So, don’t be surprised to update on daily bases. Some are downloaded daily and some have to update at regular intervals.

Up-gradation of security system
Most of computer security software needs regular updates and reviews. Most of people use only basic security systems for their computers. Basic or free software need crucial updates. However, paid software for computer security offer more security options, new features and are very easy to use. Make sure that publisher is providing you proper services for the software. Well-known protection software provides full security reviews and virus protection tips at regular intervals.
Security risks
Mostly, users are not aware of risks related to spam ware and virus databases. Spy ware can steal your personal and important information, credit card numbers, and your shopping information. They further use illegal ways of sharing information. The bad spyware programs interfere with normal computer operations. Some virus programs redirect your internet browser to different web addresses and increase risks of infection.

Virus threats require your serious attention
A virus or spyware can replicate itself and stick to any document that you send to other computers. A virus can travel through internet via e-mail attachment, and can cause harm to millions of computers. When you are opening e-mails, it is necessary to scan before opening it. Most of people have no idea about how to deal with this type of situation. Some viruses and spyware are really hard to find out from your computer, because they are hidden in the document files. They change their names and act like your documents.
If you get an e-mail from unknown source or ask to download a file from internet that you are not familiar with, then avoid it and keep your security system updated. In addition, regularly update the database. Check it and save your computer from viruses and all spyware. The best way to protect your computer from viruses is to educate yourself about computer viruses and become familiar with software, which looks like malicious software.

Tuesday, December 20, 2011

How to Speed Up Windows Seven OS ?


With the release of Windows 7, Microsoft may just have introduced the fastest operating system in the world. For those speed junkies who are never satisfied, we have provided a few tips that will help you make your PC even faster.

Disable Automatic Disk Defragmentation

The Automatic Disk Defragmentation feature in Windows is designed to maintain the health of the operating system. However, it also makes Windows run a little slower. You can put an end to this by disabling the feature and manually running at your leisure. To do so, click “Start” and select “Computer.” Next, right click on your primary hard drive and select “Properties.” Lastly, select the “Tools” tab, click “Defragment Now” and uncheck the “Run on a schedule” option.

Utilize ReadyBoost

ReadyBoost is a built-in Windows 7 feature that allows you to use a USB flash drive to enhance system performance. How is this possible? The drive itself acts as additional computer memory!
In order to make use of this feature, you will need a USB drive with at least 2 GB of space. From there, you simply connect the drive to your computer, click “Start” and select “Computer.” Next, click on the USB drive and select “ReadyBoost.” Lastly, select “Use this device” and choose as much capacity as possible below on the “Space to reserve for system speed” slide.

Disable Windows Transparency

The transparency of windows is a great perk from a presentation aspect, but this may not be the case for those with older hardware as it can drastically impact performance. The good thing is that transparency can be disabled with ease. Simply right-click on your desktop, select “Personalize,” choose the active theme and then navigate to “Windows Color.” Finally, uncheck the “Enable Transparency” option.

Disable Unwanted Features

There may be numerous Windows 7 features that you really don’t need. These same features could also slow down your computer. To disable them, click on “Start,” choose “Control Panel” and then select “Programs and features.” Next, select the “Turn Windows features on or off” option, navigate through the list and uncheck all the features you want to disable. Once you are done, simply click “OK” to remove those features.

Disable Startup Services

Startup services are notorious for slowing down performance in XP and Vista. The same holds true for Windows 7. You can disable unwanted services by hitting “Start,” typing “msconfig” in the search bar and clicking “Enter.” Click the “Services Tab” on the next window and deselect the services you do not want to automatically run at startup. While this all depends on preference, services that impact performance the most include “Offline Files,” “Tablet PC Input Services,” Terminal Services,” “Fax” and “Windows Search.”

Disable Minimizing/Maximizing Animations

Many users have already fallen in love with the minimizing and maximizing animation effects of windows. However, some may find it irritating after a while as it can eventually lead to slowdowns. If you want to disable this function, hit “Start,” enter “System Properties Performance” in the search bar and click “OK.” On the next screen, deselect the “Animate window when minimizing and maximizing” option and click “OK.”

Update Your Windows 7 Drivers

Lastly, ensure that you have the latest device drivers made specifically for Windows 7. Since your PC can have hundreds of drivers installed in it at any given time, this task can be tedious. Luckily there are 3rd party utilities out thee such as DriverFinder™, which can greatly speed up this process.

Tuesday, November 8, 2011

How to Create Your Own Customized Run Commands


Run commandThe Run command on Microsoft Windows operating system allows you to directly open an application or document with just a single command instead of navigating to it’s location and double-clicking the executable icon. However, it only works for some of the inbuilt Windows programs such as Command prompt (cmd), Calculator (calc) etc. So, have you ever wondered how to create your own customized Run commands for accessing your favorite programs, files and folders? Well, read on to find out the answer.

Creating the Customized Run Command

 Let me take up an example of how to create a customized run command for opening the Internet explorer. Once you create this command, you should be able to open the Internet explorer just by typing “ie” (without quotes) in the Run dialog box. Here is how you can do that.
 
1. Right click on your Desktop and select New -> Shortcut.
2. You will see a “Create Shortcut” Dialog box as shown below
Create Shortcut
 
3. Click on “Browse”, navigate to: Program Files -> Internet Explorer from your Root drive (usually C:\) and select “iexplore” as shown in the above figure and click on “OK”.
4. Now click on “Next” and type any name for your shortcut. You can choose any name as per your choice; this will be your customized “Run command”. In this case I name my shortcut as “ie”. Click on “Finish”.
5. You will see a shortcut named “ie” on your desktop. All you need to do is just copy this shortcut and paste it in your Windows folder (usually “C:/Windows”). Once you have copied the shortcut onto your Windows folder, you can delete the one on your Desktop.
6. That’s it! From now on, just open the Run dialog box, type ie and hit Enter to open the Internet Explorer.
In this way you can create customized Run commands for any program of your choice. Say “ff” for Firefox, “ym” for Yahoo messenger, “wmp” for Windows media player and so on. 

To do this, when you click on “Browse” in the Step-3, just select the target program’s main executable (.exe) file which will usually be located in the C:\Program Files folder. Give a simple and short name for this shortcut as per your choice and copy the shortcut file onto the Windows folder as usual. Now just type this short name in the Run dialog box to open the program.

I hope you like this post! Pass your comments.

Monday, November 7, 2011

How to Write-Protect Your USB Flash Drive


USB Write ProtectMany a time, it becomes necessary for us to write protect our USB flash drive so as to protect it from viruses and other malware programs. Because flash drives are so popular and most widely used to move data between computers, they are the prime target for attackers as a means to get infections spread around the computer world. Also, since USB drive is not a Read-Only Memory (ROM), the data inside it can easily be modified or deleted by malware programs.
But unfortunately, most of the new flash drives do not come with a write-protect feature as the manufacturers wish to cut down the cost of production. Hence, the only way to write-protect your USB flash drives is to enable this feature on your own computer.

This can be done by adding a small entry to the Windows registry which acts as a switch that can be enabled to make use of the write protection or disabled to allow write access. Just follow these steps:
1. Open the Registry Editor (Open the “Run” dialog box, type regedit and hit “Enter”).
2. Navigate to the following Registry key:
HKEY_LOCAL_MACHINE\SYSTEM\CurrentControlSet\Control\
 3. Create a New Key named as StorageDevicePolicies. To do this right-click on Control, and click on New->Key and name it as StorageDevicePolicies.
4. Now right-click on  StorageDevicePolicies and create a New->DWORD (32-bit) Value and name it as WriteProtect.
Write-Protect USB Drive

5. Double-click on WriteProtect and set the Value data to 1.
Now the right-protection for USB drives is enabled on your computer (no restart required) and thus it would not be possible for anyone or any program to add/delete the contents from your USB flash drive. Any attempt to copy or download the files onto the USB drive will result in the following error message being displayed.
USB-Write Protect Error


 To revert and remove the write-protection, all you need to do is just change the Value data for WriteProtect (Step-5) from 1 back to 0. Now write access to all the USB devices is re-enabled.
Sometimes it may seem difficult to remember and follow the above mentioned steps each time you want to enable/disable the write protection. Hence as an alternative way, there are many tools available to automatically enable/disable the write-protection feature. One of my favorite tool is USB Write Protect by Naresh Manadhar. Using this tool you can limit write access to your USB drives with just a click of a button. 

You can download this tool from the following link:
 
[Via Gohacking]

Saturday, October 1, 2011

How to Enable the Hidden Windows 7 Admin Account

Lead Image

Imagine you have a Windows PC with a single user account, and you just lost your password. Here’s how to enable the hidden Administrator account with nothing more than the install CD and some registry hacking magic so you can reset your password.
Normally if you wanted to enable the hidden administrator account from within Windows, you’d need access to an Administrator mode command prompt, but that won’t work if you don’t have access, right? This is a great way to quickly enable the hidden admin account so you can reset the password on your main account.
Note: This will require editing the registry which is risky. Proceed only if you know what you are doing and at your own risk.

Enabling the Hidden Administrator Account

Now prepare your Windows 7/Vista DVD and restart the computer with the DVD in the DVD Drive—you’ll want to boot from the DVD so you may need to change the boot order in the BIOS. Depending on your system you will need to press Del, F2, or F12.
After you’ve successfully booted from the DVD you’ll be presented with the language setting of the Windows setup. Click next.

Language Sellection

In the next screen click “Repair your computer” from the bottom left corner of the window. Now the setup will search for Windows installations then display them, choose the Windows you want and click next. The setup may try to search for problems and may ask you if you want to restore your computer, just click no. Finally you’ll arrive at

Thursday, September 15, 2011

Battle of the File Copiers: Windows, TeraCopy, and SuperCopier

banner-01
We’ve covered two popular file copying programs for Windows: TeraCopy and SuperCopier. But how well do they really work, and do we even need them? We pit them in battle for your amusement, readers, so check out who won.

Both TeraCopy and SuperCopier are How-To Geek favorites as alternative file copiers. Both offer extra features, such as queuing files, pausing and resuming transfers, and more. Perhaps most importantly, both make the claim of boosting copying speed. We put that claim to the test against Windows 7’s copying ability.

How the Test Was Run

In order to test fairly, I ran four distinct copy actions with each program and with the default Windows 7 copy function. First, I copied a file of 4.4 GB from one external hard drive, A, to my internal one, B. Then, I copied that file to another external hard drive, C. Then, I copied a 24 GB folder (3300 files, with an average size of about 8 MB) from external A to my internal drive, B. And lastly, copied that folder from my internal drive to external C. This was done in order for each of the copying methods. The external drives were ejected and the system was rebooted between testing each program. All partitions used NTFS. The 4.4GB file I used was my Wii disc backup of Donkey Kong Country Returns. The 24 GB folder was a portion of my music collection, mostly .mp3s and some .flacs I ripped over the years.

Why did I decide to do that? Well, there are quite a few factors to this test, including hard drive speeds. All of the drives I ran this test on were 7200 RPM hard drives and had a cache of 8 MB. External A was a 2 TB internal drive in an enclosure, and external C was a 750 GB store-bought drive. Copying the files in order the same way each time discounted any advantage one program would have had over another by way of caching. A clean reboot ensured near-optimal performance for each task. I also configured TeraCopy and SuperCopier to be the default copiers, and I clocked from the time I hit Ctrl+V. This minimized the influence of pre-caching before hitting the Start button on each. I did my best for you readers, and ultimately it came down to the copying programs themselves.

Test Results

win 4gb
The default Windows 7 copier proved to be pretty snappy. Copying a single 4.4 GB file from A to B took only 3:13 and copying from B to C took 2:42. Windows 7 seems to prove itself with large files. When copying 24 GB of my music collection, the process took 18:21 from A to B, and 18:09 from B to C. As you can see, Windows 7 is no slouch.
win 24gb
The one thing that seemed pretty consistent was that as the transfer pushed forward, the rate of transfer would drop over time, ending at about 2/3 of what it initially was at. In numbers, this was roughly 26 MB/s down to about 17 MB/s.
teracopy 4gb
Testing TeraCopy yielded some interesting results. Copying the 4.4 GB file took longer than Windows did, at 3:41 from A to B and 2:53 from B to C. While copying 24 GB of smaller files, however, TeraCopy undercut Windows with 17:32 from A to B and 17:02 from B to C.
teracopy 24gb
The transfer speeds fluctuated quite a bit compared to Windows 7’s copying mechanism. The rate would drop sharply at times to half, then shoot up for a brief time only to even out a bit. It was like a roller coaster, going anywhere from as high as 31 MB/s down to 12 MB/s.
supercopier 4gb
While using SuperCopier, I immediately noticed the sustained transfer speeds. It never dipped too low, even towards the end of the longer copying process, and stayed between 22 MB/s and 18 MB/s. Copying 4.4 GB from A to B took 3:21, beating out TeraCopy for second-place. However, copying from B to C took 4:01, significantly longer than either TeraCopy or Windows.
supercopier 24gb
24 Gb of smaller files took the longest, at about 19:20 from A to B and 18:53 from B to C. I did like the steady transfer speeds, though, so this might be noteworthy if you’re paranoid about backups.

Crunching the Numbers

It seems that copying large individual files works best using Windows 7’s copying ability, at least if speed is what counts. On the other hand, when copying a large amount of smaller files, TeraCopy seems to have the edge. Our test wasn’t anywhere near scientific, but we did our best to make sure we could rule out interference while still trying to emulate some real-world use. Your mileage may vary, of course, as there are quite a few variables at play here. The numbers were all over the place, so lets take a look at why they might be the way they are.
First and foremost, since we are using mechanical drives and not solid-state storage, seek times and the like come into effect. Copying a single large file can be a simple matter or a complicated one, depending on whether the file is in contiguous area or split up and written in the gaps on a fairly full drive. The same thing applies when considering multiple-file operations. Essentially, you can consider single large files and multiple smaller files to be two separate types of copy operations depending on your hardware.
supercopier 24gb2
Another thing to look at is the fact that TeraCopy has an arguable advantage over SuperCopier in that it has 64-bit support. SuperCopier is only 32-bit. Both programs are also a little out of date – TeraCopy hasn’t had an update in a year, and SuperCopier’s last version was in 2009. So why bother using them at all?
TeraCopy has a nice list of features, which we’ve covered before. You do have to pay for a license to be able to remove individual files from your copy queue, selecting files with the same extension, and using favorite folders. On the other hand, SuperCopier is free and offers more features, like file prioritization and custom responses for overwriting or skipping files. It also has pretty good sustained speeds from our tests, which I suspect will go a long way when copying a large number of large files.

Verdict

It may seem crazy if you’re coming from XP/Vista, but our tests showed that Windows 7 is more than capable of handling large files on its own. When shooting for a larger number of files, TeraCopy ekes out ahead of Windows by a small margin. SuperCopier’s not without its advantages, however; its sustained rates and decent performance for large files makes it ideal when working with a multitude of them.
features tc
If anything, the results were mixed. If I had to pick, I’d say TeraCopy wins for day-to-day performance, since I’m usually copying more small files than single large ones. It’s got a ton of features and the performance gain is worth the € 14.95 it cost me. That’s just me, though, and you may have a definitive winner considering your use, especially looking at SuperCopier price tag (free).

Thursday, September 8, 2011

10 Things you don’t want to know about Bitlocker…

So, with the forthcoming release of Windows 7, the ugly beast known as “Bitlocker” has reared its head again.

For those of you who were around during the original release of Bitlocker, or as it was known then “Secure Startup”, you’ll remember that it was meant to completely eliminate the necessity for third party security software. Yes, Bitlocker was going to secure our machines against all forms of attack and make sure we never lost data again.

What happened?

Bitlocker was/is actually pretty good – it’s nicely integrated into Vista, it does its job well, and is really simple to operate. As it was designed to “protect the integrity of the operating system”, most who use it implemented it in “TPM Mode”, where no user involvement is required to boot the machine..

And that’s where problems started.

Hands up how many people have a TPM chip on their laptop?
Everyone I bet – it’s a ubiquitous piece of hardware nowadays. Ok, another show of hands please for those who’ve enabled, and taken ownership of the chip? ”Taken ownership?” – yes, you remember going through the personalization phase of the chip, enabling it in the BIOS etc? Remember, all TPM’s are shipped disabled and deactivated.

What? You didn’t go through that yet? You didn’t do that before you deployed your laptops? Oh well, Bitlocker’s going to be a bit of a struggle for you isn’t it?

Fact 1. To use Bitlocker without adding additional authentication, you need an enabled, owned TPM1.2+ hardware chip.

Ok, For those of you who did go through this I congratulate your foresight. The only problem of course is:

Fact 2. Bitlocker with TPM-Only protection is vulnerable to Cold Boot, Firewire and BIOS Keyboard Buffer attacks.

Damn! Sorry to tell you this but there are some pretty simple attacks on your TPM-only machines – Do a google search for ”Bitlocker Firewire” or “Bitlocker Cold Boot” or”BIOS keyboard” and you’ll find lots of research, and even a few tools which will unlock your nice “protected” machine and recover the data.
To make a machine secure, and by that I mean give you protection against having to disclose loss of personal information to all your customers if the machine goes missing, you need to use some form of pre-windows authentication (with or without TPM as well – it makes no difference). Microsoft themselves recommend this mode of operation.

For Bitlocker, turning on authentication gives you a couple of choices, you can set a pin for the machine, and also if you want, you can use a USB storage device (a memory stick, NOT a smart card) as a token. Yes, I did say a pin, and I certainly did not say “your Windows user ID and password” In fact I didn’t mention users at all. Bitlocker officially supports ONE login, so if more than one person uses a machine, you’re going to have to share that with everyone.
I feel some facts coming on…

Fact 3. Bitlocker is only secure if you use a pin or USBstick for authentication 

Fact 4. There’s no link between your Windows credentials and Bitlocker Credentials 

Fact 5. Bitlocker does not support the concept of more than one user

 Even Microsoft’s official advice tells you to use a 6+char pin, plus TPM for authentication – no using it in TPM only mode now!

Ok, so now your lucky Bitlocker users have pc’s protected, maybe with a TPM, but certainly with some form of authentication which is shared between the owner of the machine, and probably you (as administrator), and the system guys etc. Hey – you probably have an excel spreadsheet with everyone’s pin’s written down?
I hope so, because when those users start forgetting their pins, who’s at the end of the phone? The good news is the pin never changes – there’s no forced change or lifetime.

What do you mean, that doesn’t fit with your password policy? Did I mention yet that the PIN can only be made from the Fn keys, not the normal letter keys unless you configure a special “Enhanced Pin” mode which does not work on non-USA keyboards? Did I mention there’s no complexity or content rules apart from Length?

Fact 6. Bitlocker PIN’s are usually FN key based. Bitlocker does not support non-US Keyboards
Hands up again all of you who’ve implemented PKI smart cards, or bought laptops with fingerprint sensors, or who have tokens such as ActivIdentity, CAC, PIV, eToken Keys, DataKey cards, SafeNet cards etc? You’d like to be able to use them for authentication to your PC’s wouldn’t you?

Fact 7. Bitlocker only supports USB STORAGE devices and PINs – no integration with any other token

And of course, you want users to be able to reset these credentials when they forget them without calling you, or your overworked, understaffed helpdesk? Sorry. No can do.

Fact 8. There’s no built in self-service pin recovery for Bitlocker users
There are Active Directory based methods, the GPO settings will let you store the (fixed) recovery key in your AD. I’m not sure how you feel about that getting propagated to every controller in your forest, but I’m sure you know and trust EVERY AD administrator in your organization who (now) have access to those keys. I mean, if someone was to dump out those keys and then quit, what would you do? It’s not as if the key ever expires. I guess you could write a program and then run it on every machine to recreate the keys, or write the recovery key down and give it to the user to hold on to?
Going back a bit, let’s review why we are going through this effort in the first place. I know the flippant answer is “because we were told to secure our machines”, but what does that mean? Most likely your company falls under one of the 250+ global laws defining and mandating the protection of peoples personal data, social security numbers, health information, credit card numbers etc. Regulations such as PCI, HIPPA, HITECH, SOX etc. You’re wanting to use Bitlocker to encrypt your machines because then, WHEN they get lost or stolen, you won’t have to pay fines, or tell everyone you lost their data, because to be honest, you didn’t did you? You lost the machine sure, but as the data was encrypted, no one can get access to it.
To use this “get out of jail” card you need to be able to prove a couple of things:
  1. That the data was indeed protected at time of loss
  2. That the protection method was appropriate given the type of data.
So, applying those tests, a rule appears.

Fact 9. You need extra software to PROVE Bitlocker was enabled and protecting the drive at time of theft to claim protection from PII laws

Personally, I know how to set GPO’s etc to mandate the use of Bitlocker, but I also know how easy it is for a user to turn it off. I don’t know of anything in Active Directory which gives me a definitive answer as to the state of protection of a given machine. There’s even a command line tool which can be run to completely (un)configure it. We need something that reports on the state of protection of a lost machine – just saying “well,. the policy says it should be encrypted” is not enough. Perhaps a reader can help out?
Ok, let’s finally take a look at implementing this solution. Now, you do have a 100% Vista Ultimate / Windows7 Enterprise environment don’t you? What? You still have some XP and Vista Business out there? Are you going to leave those machines unprotected, or are you planning to run a mix of third party software and Bitlocker?

Fact 10. Bitlocker only supports Windows7 Ultimate/Enterprise and Vista Ultimate.

It may come across that I’m not a great fan of Bitlocker - that’s far from the truth. I would use it (personally), and would recommend it to my friends etc. I see it as REALLY good for technical, trustworthy end users. But, that’s not the market it’s being promoted for is it? Nothing fills me with dread more than an enterprise product which requires yet another password, require specific hardware which is not enabled by default, presents a black screen with white text to users (urgh! So archaic), does not conform to our recognized password/pin lifetime policies, does not work on non-USA machines, and does not have audit-friendly output for the main purpose it serves, i.e. tell me if this stolen machine is a liabiltiy or not. Come on now - it’s 2009! Don’t we deserve better?
I actually like it because of the following 10 reasons:
  1. Only 1 of the 3 machines I use has a USA keyboard, so I can use FN mode Pins
  2. It never forces me to change my Pin
  3. I can turn it on and off whenever I like without my corporate IT people knowing.
  4. I get to use the TPM chip, even though it took me a whole day to work out how to enable it
  5. I can write fancy scripts to turn it on and off (I’m a closet programmer)
  6. I get a nice dos-like screen when I turn my machine on, just like 20 years ago
  7. Bitlocker is mostly controlled through a command line script (manage-bde)
  8. My local IT team can’t come and use my machine, or see what’s stored on it without me knowing
  9. I know that no one will be able to recover my data if I leave McAfee
  10. I just like things to be done the hard way

Wednesday, September 7, 2011

What is a BitLocker Drive Encryption startup key or PIN?

When you use BitLocker Drive Encryption, you need a BitLocker Drive Encryption startup key or personal identification number (PIN) to start your computer.

BitLocker stores its own encryption and decryption keys in a hardware device called the Trusted Platform Module (TPM) security hardware, which is a special microchip in some newer computers that supports advanced security features. The keys are not stored on the computer’s hard disk. The TPM must be accessible by the basic input/output system (BIOS) during startup. When you start your computer, BitLocker will get these keys from the TPM automatically.

Note

Some of the following BitLocker features and settings can be enabled by Group Policy settings.
If your computer was not manufactured with TPM version 1.2 or higher, you can create a BitLocker startup key using a USB flash drive to store the encryption keys and decryption keys. You will have to insert the flash drive each time you start the computer.

In addition to the option of creating a startup key, you have the option of creating a startup personal identification number (PIN). You can create either the startup key or the startup PIN, but not both. The startup PIN can be any number that you choose from 4 to 20 digits in length. The PIN is stored on your computer. You will have to type the PIN each time you start the computer.

You can only create a startup key or PIN when you turn on BitLocker for the first time. After you create the startup key or PIN, you can use the BitLocker Manage Keys feature to change the PIN. You can also make additional copies of the startup key to use in case you lose the original.
The following table describes important BitLocker terminology.

Term What it means

TPM ownership password
This is a password that is set up to associate the TPM chip with your computer. This is done automatically by the BitLocker wizard, unless you have set it up ahead of time. You will only need this password if your TPM chip was set up before you enable BitLocker.
Recovery password
This is a user-readable 48 digit number that can be stored on a USB flash drive, in a folder on another drive, or printed out. You will only need the Recovery password if you have a problem with your computer (such as a defective power supply), or you move your hard disk to another machine. When BitLocker saves the Recovery password to a USB flash drive, it also saves a machine-readable version so you can just plug in the drive rather than typing a long password. If the USB flash drive is not available, you will have to type in the 48 digit password.

Notes

  • If you create a backup for your startup key or PIN, or you create a recovery password, make sure you store them on separate removable media.

  • Assistive technology software that runs on Windows, such as screen reading software, cannot read BitLocker startup screens because they are displayed during BIOS startup and before Windows runs. This includes screens used when you type a PIN or recovery password, and any BitLocker error messages.

To copy your BitLocker keys or change your startup PIN

  1. Open Bitlocker Drive Encryption by clicking the Start button Picture of the Start button, clicking Control Panel, clicking Security, and then clicking Bitlocker Drive Encryption. Administrator permission required If you are prompted for an administrator password or confirmation, type the password or provide confirmation.
  2. Click Manage keys, and then follow the instructions.

Monday, September 5, 2011

ManicTime : Keeps Track of your PC Activities

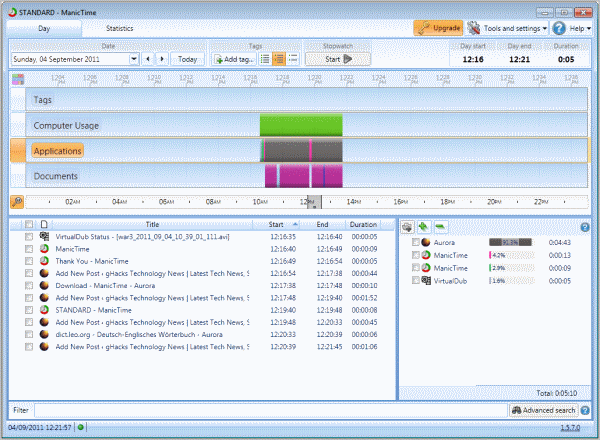
If you’d have to analyze a normal work day on your computer, how would it look like? What are the common applications that you open? Which website do you spend the most time on? It can be quite difficulty to calculate those numbers manually, and it is likely that you may be way off. That’s where time tracking software like ManicTime can help. The program monitors all PC activities automatically, so that you know exactly what you have done on your PC at a specific time of the day.

The program is offered as a limited free version and commercial versions. ManicTime Free comes without program support and advanced features like password protection, categorization of applications or advanced search functionality.

The free version of the time tracking software tracks and analyzes application usage automatically, and creates charts and statistics about the general computer usage.

When you start the program for the first time, you will see a tabbed interface that is divided into two main areas. The area at the top of the program window displays the current day and a time bar that visualizes computer, application and document usage on the computer. Different programs and documents are displayed with different color sets. Hovering the mouse over them displays tooltip information about the program, time and duration as well as document titles and related information.


The lower half of the screen displays the active application or document (e.g. browser tab) and totals combined (e.g. how long you spend in the Firefox browser).

The statistics tab displays various information like the top applications and documents, top computer usage or day durations.

You can pause tracking at any time with a right-click on the program’s system tray icon and the selection of “Go off the record”.

The information that ManicTime present can be a real

Sunday, September 4, 2011

How to Install IIS onto Windows 7

IIS, or Internet Information Server, is a web server application that you use to set up your own web server, and publish your own content. You can use IIS to set your computer up to act as an Internet web server, or it can be used locally to serve an intranet. Many companies use intranets as a resource for employees to share information and can be very useful.

When you first install Microsoft Windows 7, IIS is not turned on by default, so in other words you cannot begin to publish websites straight out the box. It is however, easy to turn on, and this is how you do it.
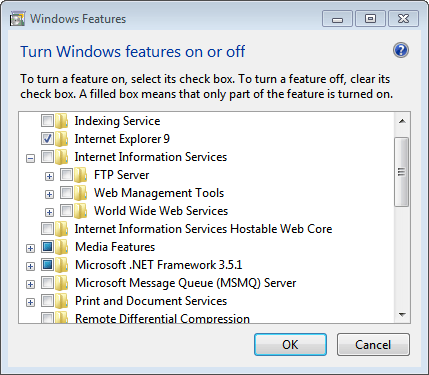
Firstly, you need to go to your start menu, and click on Control Panel. This is an area where you can alter settings on your computer, and add or remove specific programs. Find the section called “programs” and click on it. This should bring up a new window with a list of selections. One of these options will be to “turn windows features on or off”. Find this and click on it to go to the next screen.

The next screen will be a long list of windows features that are already a part of Windows. Some will be turned on already by default, and some will be switched off. You need to find the section called “Internet Information Services” and click on the plus symbol next to it. IIS has many parts to it, and by expanding this section, you are revealing all those parts so you can choose which ones to turn on.

internet information service

You will see three sections, FTP Server, Web Management Tools, and World Wide Web Services. Each one will have multiple options inside. The main one will be under Web Management Tools, and will be called “IIS Management Console”. You need to check this box. This effectively turns on IIS on your system. While you’re in this section, you can also check any other features you think you may need. For example if you want to set up your computer as an FTP server, you can check the boxes related to that. FTP will allow you to give access to some of your files to friends and work colleagues by giving them login permissions. The will then be able to download files you give access to directly from the Internet. They may also be able to upload files directly to you computer if you give them access to do so. FTP can be a very useful feature.

However, now that you’ve checked the “IIS Management Console”, all you need to do is click on “apply”. You may then need to reboot your computer, as Windows will need to make certain changes in order to activate the new feature. Once you’ve rebooted, you should be able to go to the address http://localhost/ on your computer in order to access IIS. Of course you’ll need to set up the system and then design your web-pages, but for now you have successfully set up your very own web server.

OpenWith Enhanced Improves Window’s Open With Dialog

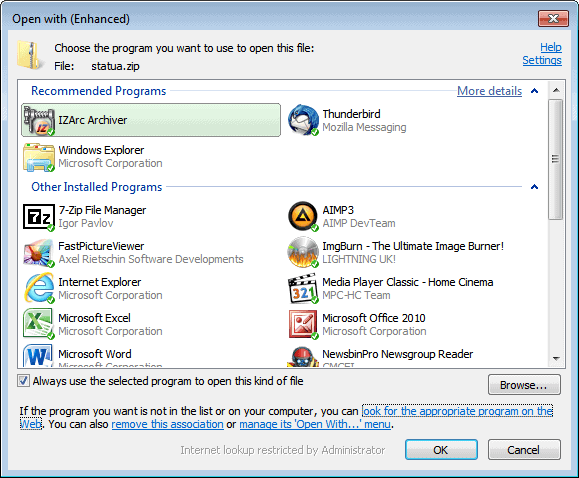
The Windows operating system displays the Open With dialog when a user clicks on a file that has an unregistered file extension. The Open With dialog in theory should display programs installed on the system that might be able to open the file on the computer. It also includes a browse option to pick a program from the computer manually, which can be handy for portable applications or programs that Windows has not included in the listing.

Sometimes no program is displayed at all, which leaves the user with no other choice than to search the Internet for a suitable program to open the file type.

OpenWith Enhanced improves the Windows Open With dialog. The program is compatible with all recent versions of the Windows operating system. Once installed, it turns the Open With dialog into a more user friendly version.

openwith enhanced

The program uses a program association database that is constantly updated to suggest applications that can be used to open the selected file in the Windows operating system.

Installed programs are displayed with different backgrounds than programs that are not installed. A click on a program that is suggested but not installed will open the program’s home page on the Internet from where it can be downloaded to the local PC.

That’s handy for users who have no idea which program they need to open a specific file type, and users who would like to try out alternatives to programs already available on the system.

The program options are displayed with a click on Settings. Here it is possible to change the application backgrounds and label colors, the way programs are displayed in the Open With dialog, the sending of anonymous usage statistics and if the program should check for updates regularly.
Another interesting option is the ability to remove file associations for users on the system, and to remove Open With menu entries in Windows Explorer to clean up the context menu of Window’s native file management tool.

Lastly, a click on “look for the appropriate program on the Web” opens the OpenWith Enhanced database on the Internet.

Windows users can download OpenWith Enhanced from the developer website.

Saturday, September 3, 2011

How to Remove Programs and Features Not Listed in Programs & Features in Windows 7

Just like in XP, some programs, components, and Features aren’t listed in the Programs and Features section in Control Panel. You might be wondering how to remove some of those in Windows 7. Today we show you how.


Turn Windows Features Off

1. Back in the XP days, we covered how to uninstall Windows Components that aren’t listed in Add/Remove Programs. The Add/Remove Programs section in Control Panel has been renamed to Programs and Features in Windows 7.

Just like in XP some programs such as Games, Internet Explorer, Windows DVD Maker and others aren’t included in the Remove list. For this tutorial we’ll turn off the Windows DVD Maker which is located in the Start Menu.
sshot-2011-06-10-[01-23-00]
2. To remove or turn it off, click Start and type Programs and Features into the Search box and hit Enter.
sshot-2011-06-10-[01-04-02]
3. That opens Control Panel – click on Turn Windows features on or off hyperlink on the left panel.
sshot-2011-06-10-[01-07-53]
4. The Windows Features window will come up and you’ll see a list of the different features you can turn on or off. There is a checkmark next to the ones that are currently on.
sshot-2011-06-10-[01-08-18]
5. Expand the Media Features tree and simply uncheck the box next to Windows DVD Maker. Then you’ll see the following message, just click Yes.
sshot-2011-06-10-[01-12-58]
6. Then click OK in one the Windows Features window.
sshot-2011-06-10-[01-38-34]
7. You’ll see a progress screen while the feature is turned off. Notice it can take several minutes, but in my experience it took less than one. Depending on the feature you remove your results will vary.
sshot-2011-06-10-[01-13-37]
8. After it’s done, close out of the Windows Features box and Control Panel. Then when you open the Start menu, Windows DVD Maker no longer appears.
sshot-2011-06-10-[01-29-44]
9. It’s no longer in the Start Menu, but to ensure it’s turned off type dvdmaker.exe into the Search box in the Start Menu and hit Enter. You’ll first notice that there are no results found under the search results in Start.
sshot-2011-06-10-[01-52-46]
10. It won’t be found anywhere in your PC.
sshot-2011-06-10-[01-54-16]
Microsoft Components and Features are integrated deep into the OS and this method doesn’t actually uninstall them. However, if there are ones you don’t use, you can easily turn them off.

Monday, August 15, 2011

What is HTTP, Role of HTTP in Web and HTTP Status Codes

There are two main modes of transferring file over the World Wide Web, one is FTP (file transfer protocol) and other is HTTP (Hypertext Transfer Protocol) Which is the set of rules for transferring files (text, graphic images, sound, video, and other multimedia files) on the World Wide Web. As soon as a Web user opens their Web browser, the user is indirectly making use of HTTP. HTTP is an application protocol that runs on top of the TCP/IP suite of protocols. Whereas, FTP is used to transfer bulk files
How HTTP works

We submitted URL (universal resource locator) in the URL bar and hits enter, Then our browser send HTTP requests to the web server for the web pages. Web server serves the HTTP request by convert that page in to appropriate form that our web browser can read and send the result via HTTP response. So HTTP is a medium to communicate to the web server. One more thing some server sends HTTP cookies on the web browser, in which all the personal setting and login data of user is stored.
HTTP
There are various HTTP status codes to maintain the internet standards and helpful to sort out the problem. HTTP status codes are divides in to four major categories.
  • 100-101 Intermediate Status
  • 200-206 Successful Response
  • 300-307 Redirects
  • 400-417 Request Errors
  • 500-505 Server Errors
http-server-header-status-codes
The details of these HTTP status codes are:
  • 100-101 Intermediate Status
100 continue The server returns this code to indicate that it has received the first part of a request and is waiting for the rest.
101 switching protocol The requester has asked the server to switch protocols
  • 200-206 Successful Response
200 Successful The server successfully processed the request
201 created the server created a new resource
202 accepted request is accepted and under processing.
203 Non-authoritative information The server processed the request, but is returning information that may be from another source
204 No content Server not returning any content after processing request
205 reset content response requires that the requester reset the document view. after facing 204 status code.
206 Partial content The server successfully processed a partial GET request.
  • 300-307 Redirects
300 Multiple choices There are multiple choices for users.
301 Moved permanently In future user will be redirected to the given url
302 Moved temporarily Temporarily user will be directed to the given url
303 See other location For all requests other than a HEAD request, the server automatically forwards to the other location.
304 Not modified The requested page hasn’t been modified since the last request.
305 Use proxy The requester can only access the requested page using a proxy.
306 Switch Proxy No longer used.
307 Temporary redirect The request should be repeated with another URI, but future requests can still use the original URI.
  • 400-417 Request Errors
400 Bad request The request cannot be fulfilled. because it is inappropriate.
401 not authorized specifically for use when authentication is possible but has failed.
402 Payment Required No longer used
403 forbidden Access decline due to unauthorized.
404 Not found When no results found as per query or URL provided by user
405 method not allowed The method specified in the request is not in the correct form.
406 Not acceptable The requested page can’t respond with the content characteristics requested
407 proxy authentication required Need to authenticate with proxy
408 Request timeout Request is not processed in the appropriate time interval
409 conflict When request conflict occurs
410 Gone Indicates that the resource requested is no longer available and will not be available again
411 length required The server won’t accept the request without a valid Content-Length header field
412 Precondition failed request fails to fulfill the precondition that are required by web server
413 request entity too large Server is not able to process too long request
414 Requested URI is too long Server can’t process long query string.
415 unsupported media type The request is in a format not support by the requested page
416 Requested range not satisfiable The server returns this status code if the request is for a range not available for the page
417Expectation failed server failed to process what ever the request expect by the client

  • 500-505 Server Errors
500 internal server error Server fails to interpreters the HTTP request. 

501 Not implemented When request is partially completed or can’t be send to client

502 bad gateway Server gateway is nor responding

503 Service unavailable server  is temporary out of service

504 gateway timeout Didn’t receive timely response from upstream server.

505 HTTP version not supported The server doesn’t support the HTTP protocol version used in the request.
I hope the concept of HTTP is very clear to you.

Wednesday, July 27, 2011

Computer tips to bring computer to normal state when it freezes or hangs up

Sometimes when you are in the middle of someting and suddenly your computer hangs or freezes. You are left with no other option than to restart your computer directly. But the only problem is, you have not saved your work! Don’t panic! There is a solution for that! And you can surely save your file! Here’s how:
First keep on pressing “Num Lock” key until your Operating system is back to normal state. This releases the processor from any busy process. If this doesn’t work then follow the below ten tips to bring you computer back to normal state when it is struck.

1. Click on “ctrl-alt-delete” keys. The windows task manager will then open, click on all programs that you don’t need and end the task. You will see that all programs on your taskbar will close one by one. If this will resolve the issue! – then save!

(Tip 1: if you’re working on an MS Office application, it will automatically save your file in case the programs suddenly shut down —

Tip 2: always save your file at least every 2 minutes by just simply clicking on the “diskette icon”— its just one click!)

2. If it did not resolve the issue, are there some users logged on that computer? If so, go to switch user (for XP) and log off that user, go back to your log on screen and log on again. The reason the computer hang up is because if there are many open programs and applications, these retains in the memory, if it is too much for the memory to handle, it freezes! Another reason too the computer hang up is because if you are connected to the internet via dial up, and you are running too many applications and opening many websites. So I suggest, if you are multimedia user or a heavy internet user, then you are better off with a higher memory, at least 512Mb of memory. There are simple ways to avoid computer to freeze or hang up:

3. Clean your history at least once a week >tools>internet options>clear history. I normally set my history to “0”, meaning, when I restart my computer, it doesn’t save history pages that I have visited

4. Delete all internet temporary files >tools>internet options>delete files (do the “offline” content too!)

5. Delete cookies (some do not do this, but I do delete cookies at least once a week!) >tools>internet options>delete cookies
6. Remove unnecessary programs that you no longer use they are just occupying space and memory! >control panel>add/remove programs

7. Do defragmentation at least once a week >point the mouse to “start” button, then right click “explore”>right click the mouse pointing to drive C (which is usually the main system logical drive) >properties>tools>defragment now

8. You can also check the logical drive’s volume for errors >point the mouse to “start” button, then right click “explore”>right click the mouse pointing to drive C (I repeat, is usually the main system logical drive) >properties>tools>check now

9. It is better to have only one user being logged on. Even if there are many users, make sure the user logs off after using the computer, rather than keeping it logged on and you do the switching of users. Switching users is good as long as you don’t keep all users logged on—I think that is more logical

10. Always shut down properly the computer (do NOT use the power button when turning it off!

Tuesday, July 26, 2011

How to Create your own Run Command ?

I talk a lot about Windows, and using the “Run” command is a large part of it. It is a simple and easy method of accessing programs quickly. If you happen to want to make a shortcut to an application your own way, guess what, you can!

Let’s do it:

Step 1: Go to “Start,” “Run,” (told you we use it a lot) and type regedit.

Step 2: Navigate to the following:
HKEY_LOCAL_MACHINE\SOFTWARE\Microsoft\Windows\CurrentVersion\Apps Path

Step 3: Create a new folder/key under Apps Path. (Right-Click Apps Path and click “New,” “Key.”)

Step 4: Title the new folder/key the name of the application, e.g. firefox.exe.

Step 5: Right-Click the default string value (the thing automatically created in your new folder) and click Modify.

Step 6: Change the value to the path of the executable you are attempting to run. E.g. C:\Program Files\Mozilla Firefox\firefox.exe.

Step 7: Create a new “String Value” by right-clicking under the default value (the thing we just edited) and select “New,” “String Value.” Name it Path and enter the value as the same path you previously entered.


Step 8: Done! Now, all you need to do is go to “Start,” “Run,” and type the name of your command!

Sunday, July 17, 2011

Windows 7 Keys............For activate.......

Use the below keys to activate your windows 7

482XP-6J9WR-4JXT3-VBPP6-FQF4M

7XRCQ-RPY28-YY9P8-R6HD8-84GH3

D9RHV-JG8XC-C77H2-3YF6D-RYRJ9

JYDV8-H8VXG-74RPT-6BJPB-X42V4

RFFTV-J6K7W-MHBQJ-XYMMJ-Q8DCH

Thursday, July 14, 2011

How To Speed Up Menus in Windows 7

The new user interface in Windows 7 elegant and smoother to navigate versus XP. However, there are tweaks you can do to make it even better. Here we’ll look at how to speed up the menus by tweaking the Registry.

This tutorial will show you how to make tweaks to the Registry in Windows. Before making any changes, it’s a best practice to back it up first.
1. Click on Start and type regedit into the Search box. At the top you’ll see regedit.exe, right-click on it and click Run as Administrator.
sshot-2011-05-13-[22-40-36]
2. The Registry editor will open. In the left pane navigate to the following:
HKEY_CURRENT_USER\Control Panel\Desktop
Then in the right panel scroll down to MenuShowDelay and double click on it.
sshot-2011-05-13-[22-49-14]
3. You should see the default Value Data is set to 400. Change this to a smaller number or you can even go with zero if you want menus to come up instantly.
sshot-2011-05-13-[22-50-00]
4. After setting the Value Data click OK.
sshot-2011-05-13-[23-02-17]
5. Now when you look under the data column for MenuShowDelay is set to zero or whatever you set it to.
sshot-2011-05-13-[23-04-18]
6. Close out of the Registry and click on the Start Menu – you should notice it opening up much faster than before.
sshot-2011-05-13-[23-07-52]
That’s all there is to it! This is just a small way to help speed up the user experience on your Windows 7 system.

[Via Simplehelp.net]