- Close all browser windows
- Start -> Run
- Type
RunDLL32.EXE IEdkcs32.dll,Clear - Click on OK, and start Internet Explorer. You should find the old spinning IE logo.
- Find out what I'm doing, Follow Me :)
Friday, February 3, 2012
Bring Back Default IE logo
Monday, October 17, 2011
How to Hack PC in Network (Remote Registry)

Click on File, and then select Connect Network Registry

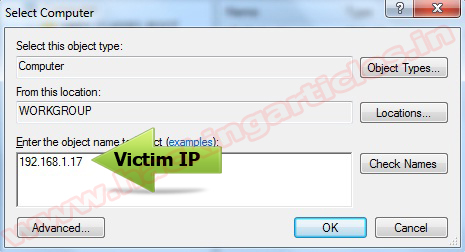
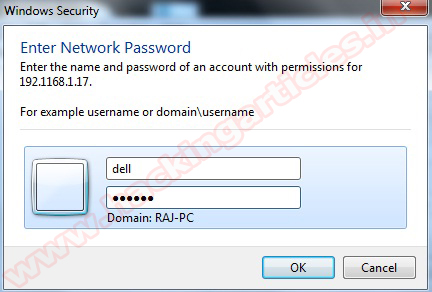
Type the remote computer IP or host name in the Enter the object name to select and the click OK.


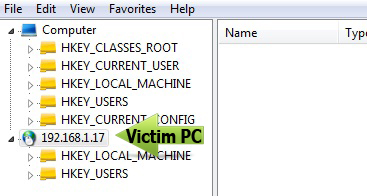
Now, the remote computer is listed in the Registry Editor.

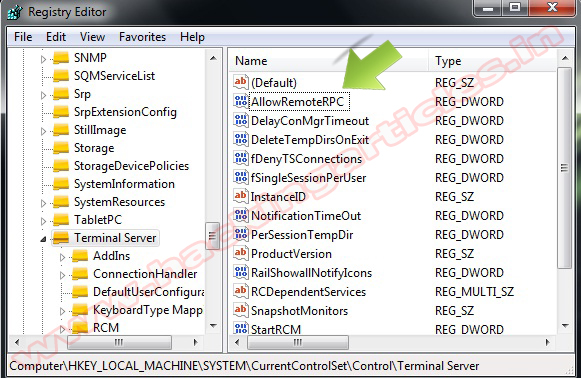
Navigate HKLM\System\CurrentConsolSet\Control\Terminal Server in the Right Panel. Allow Remote PC Change.
1 for (Disabled Remote Desktop) 0 For (Enable Remote Desktop)

Thursday, June 9, 2011
How to clear all windows history files with a single click?
Today tip will help you to manage the all types of user history in windows operating system. This is a built-in feature of all windows keeps track the user's history, for example the websites you have visited, the documents you have opened and the keywords or files for which you've searched. However this tip is very useful for you, if you are sharing your computer with others or you do not want that the other persons know about your last visited documents history. You can clear these kinds of user's history with a single click on desktop icon named Cleanmru.reg. There is no need to clear each history file one by one. This trick will work in nearly all of the windows versions like windows 2000, XP and 2003.
Follow the given steps for configuration to clear recently opened documents automatically:
To edit the computer registry, first you should log onto your computer with administrative rights.
Here copy the following 6 lines and paste in notepad then save with the name Cleanmru.reg on your desktop.
REGEDIT4
[-HKEY_CURRENT_USER\Software\Microsoft\Internet Explorer\TypedURLs]
[-HKEY_CURRENT_USER\Software\Microsoft\Windows\CurrentVersion\Explorer\RunMRU]
[-HKEY_CURRENT_USER\Software\Microsoft\Windows\CurrentVersion\Explorer\RecentDocs]
[-HKEY_CURRENT_USER\Software\Microsoft\Windows\CurrentVersion\Explorer\ComDlg32\
LastVisitedMRU]
[-HKEY_CURRENT_USER\Software\Microsoft\Search Assistant\ACMru]
Wednesday, May 18, 2011
CD ROM STOPS AUTOPLAYING/AUTORUN.!!
Solution: The service: "Shell Hardware Detection" has been set to Manual or Disabled. Go to Control Panel, Administrative Tools, Services. Return this service to "Automatic".
Tuesday, May 17, 2011
Speed Up Start Menu .>!!
Start Regedit. If you are unfamiliar with regedit please refer to our FAQ on how to get started.
Navigate to HKEY_CURRENT_USER\Control Panel\Desktop
Select MenuShowDelay from the list on the right.
Right on it and select Modify.
Change the value to 0.
Reboot your computer.
Monday, April 25, 2011
Speed up your NTFS file system
2. Type regedit,
3. Go to:
Run then type regedit:-
then Go to
HKEY_LOCAL_MACHINE>SYSTEM>CurrentControlSet>Control>FileSystem
4. Find item NtfsDisableLastAccessUpdate and give her a Value 00000001. If item don't exist make new DWORD and give her a name NtfsDisableLastAccessUpdate and Value 00000001.
5. Restart your computer
Saturday, April 23, 2011
How to prevent users from writing to USB drives
Today USB drive also known as keychain drive is becoming the most popular removable storage device to move data to different locations. USB drives are available in the market with different features, for example password protected, compatible with all windows versions and extra storage capacity (up to 65 GB).
A common security issue at organizations is how to prevent their workers to write data onto USB drives using their PCs, because a user can easily move confidential data for other location.

if you have windows XP with SP2, then you can disable the writing option to USB drives.
Follow the given steps to disable the USB writing option:
To edit the computer registry, first you should log onto your computer with administrative rights.
First click on Start button and type "Regedit" in Run option.
Here locate the location to:
HKEY_LOCAL_MACHINESYSTEMCurrentControlSetControl
Here in right side panel, click right to create a key with the name "StorageDevicePolicies".

Now in left side panel, select "StorageDevicePolicies" key, again right click to create new DWORD value then label it "WriteProtect".

Set its value to "1". But again enable this option set its values "0"

Wednesday, April 20, 2011
Haking "ADMIN" from "USER" mode and more
Really that is possible !
Refer to the other articles on this wiki for the same topicas windows seems to have fixed this bug..
still u can browse for educational purpose
u know why is it a "user" account because it lacks come service layer than that in "administrator" account
Local privilege escalation is useful on any system that a hacker may compromise; the system account allows for several other things that aren’t normally possible (like resetting the administrator password).
One sample
One trick is to use a vulnerability in Windows long filename support.
Friday, April 15, 2011
Set the status of NUM LOCK key enabled automatically
Follow the given steps to enable NUM LOCK key :
•click start button then Go to Run and type regedit and press enter.
•Here locate the location to HKEY_USERS Default Control Panel Keyboard
Here in right side panel, double click on the value
InitialKeyboardIndicators change its value data from 0 to 2
Saturday, April 2, 2011
Customize Windows Media Player Title Bar
Change the title bar to read Windows Media Player provided by , so if I had entered text MAYANK , it would read: Windows Media Player provided by MAYANK.
[Start] [Run] [Regedit]
HKEY_CURRENT_USER>Software>Policies>Microsoft Create the Key [WindowsMediaPlayer] Create String value named [TitleBar]
Data Type: REG_SZ // Value Name: TitleBar
Double click TitleBar and Enter the text to be displayed in the title bar.
Exit Registry / Reboot
Friday, April 1, 2011
Pop up banner each time window opens
Go to run and type regedit and press enter.
Then go to key
HKEY_LOCAL_MACHINE>software>Microsoft>windows>current version>winlogon
Now create a new string value in the right pane named "LegalNoticeCaption" and enter the value that u want ti see in menubar.
Now create another new string value in the right pane named "LegalNoticeText".
Modify it and insert the msg you want 2 display each time windows boots.
Its".reg"file would b:
Name==REGEDIT4
code=="[HKEY_LOCAL_MACHINESoftwareMicrosoftWindowsCurrent VersionWinlogon]"legalNoticeCaption"="Captionhere."
Wednesday, March 23, 2011
How Add Control Panel to the Desktop Right-Click Menu : Hack


HKEY_CLASSES_ROOT\Directory\Background\shell


Saturday, March 19, 2011
How To Add Defragment Option to the Right-Click Menu for a Drive : Hack


HKEY_CLASSES_ROOT\Drive\shell

Thursday, March 17, 2011
How to Add Registry Editor to Control Panel : Hack


Wednesday, March 16, 2011
Add "Open with Notepad" to the Right Click Menu for All Files : Hack

HKEY_CLASSES_ROOT\*\shell

Tuesday, March 15, 2011
How To Add "Take Ownership" option to Right-Click Menu : Hack


Thursday, March 10, 2011
How To Create Google Chrome Themes Skins Templates
1. Download and install Google Chrome
2. Download and install Resource Hacker
3. Open Resource hacker and goto > file > open,
4. XP : Navigate to [LOCAL DRIVE LETTER]:\Documents and Settings\[Username]\Local Settings\Application Data\Google\Chrome\Application\0.2.149.27\Themes\VISTA : [LOCAL DRIVE LETTER]:\Users\[Username]\AppData\Local\Google\Chrome\Application\0.2.149.27\Themes\
6. Right Click on BINDATA and click “Save [BINDATA] Resources
7. Make a new folder on your desktop called “BINDATA” and save the file as “1.txt”
8. You should now have a directory called “BINDATA” on your desktop
- Opening it should reveal many files.
9. DELETE “1.txt” within that directory. You should still be left with many files.
10. Open up Command Prompt – START>>RUN>>”CMD”
- To go up a directory in CMD type “cd..”
- To access a directory type “cd [directory name]”
- So when I opened CMD I typed in the following:
- cd “c:\documents and settings\**MY USERNAME**\desktop\BINDATA”
12. Once you have navigated to the BINDATA folder which you created, type in “ren *.bin *.png”
13. If you open up the BINDATA folder you should find a tonne of PNG files all making up the Chrome GUI.
14. You need to go through and open the ones you want to change. If you don’t have Photoshop/fireworks or some other photo/image editing application then download GIMP or GIMPshop
15. Once you have edited all the files you want to open up Resource Hacker again!
16. In the directory tree, open up BINDATA > 9000 > Now Right click on 1033 and click Replace Resource
- Navigate to your BINDATA folder
- All the PNG files in this folder should be named numerically (e.g. DATA_1, DATA_2 etc.)
- Select the first PNG (probably “DATA_1.png” and click open.
- There should now be three empty text input boxes
- in “RESOURCE TYPE” enter “BINDATA”
- in “RESOURCE NAME” enter “9000″ (or whichever directory you’re within) (If you are replacing the resource under “9001″ then enter “9001″ here etc. etc.)
- in “RESOURCE LANGUAGE” enter “1033″
17. Repeat step 17 for every single resource under BINDATA. (VERY TEDIOUS)
- Remember to change “RESOURCE NAME” each time you do this, second time it will be “9001″, then “9002″… etc….
18. The numbers within your BINDATA folder (on your desktop) may NOT correspond to the resource names under BINDATA in resource hacker, so don’t worry about that – you’ll have to progressively work your way through the resources.
19. WHEN YOU HAVE FINISHED in Resource hacker go > file > save – NOW RESTART CHROME!
Monday, March 7, 2011
How to reduce memory usage in Mozilla Firefox
Search for browser.sessionhistory.max_entries
Double click on the value 50, change it to something lower, 5 should be good.
========================
What this means?
Averagely we surf less than 5 of the websites we previously surfed before, there is no need to use up that much memory (which is 50 by default).
[Via avitricks.page.tl]
SHOW YOUR PC QUAD CORE
SHOW YOUR PC QUAD CORE OR MORE
GO TO START>RUN>TYPE REGEDIT>HKEY_LOCAL_MACHINE>HARDWARE>DISCRIPTION>SYSTEM>CENTRAL PROCESSOR>
ON RIGHT HAND SIDE RIGHT CLICK ON PROCESSOR NAME AND STRING AND THE CLICK ON MODIFY AND WRITE WHAT EVER YOU WANT
OR NAME IT QUAD CORE OR MORE
[Via avitricks.page.tl]

Stuffs
- Android (12)
- Antivirus (3)
- Backtrack (13)
- Borntohack News (5)
- Cracking (6)
- Ethical Hacking (17)
- Facebook (47)
- Filesonic Premium Accounts (3)
- Firefox (34)
- Google (66)
- Google+ (8)
- Hacking (220)
- Hotfile Premium Accounts (1)
- IPod Stuff (38)
- Linux (7)
- Metasploit (2)
- Mobile Stuff (48)
- Registry Hacks (43)
- Security (106)
- Tech News (182)
- Tricks And Tips (512)
- Trojan (5)
- Unlocking (2)
- Windows (68)
- Yahoo (5)
- cydia (2)
- hacking tools (4)
- iOS4 (11)
- iOS5 (6)
- iPad (25)
- iPhone (55)
- javascript (23)
Facebook :
Translate Website
Follow On Buzz
Hacking Purity Test Solutions
Subscribe Email :
Blog Archive
-
▼
2013
(50)
-
▼
July
(10)
- C PROGRAM TO SHUT DOWN COMPUTER
- History Behind Name of Apple
- History Behind Name of Google
- History Behind Name OF Microsoft
- History Behind Name of Yahoo
- History Behind Name of Intel
- If you don't want Facebook, Google, Gmail to track...
- Disable Delete Confirmation
- 12 Computer Programming Languages You're Probably ...
- Earn Mobile Recharges and gifts by bidding online.
-
▼
July
(10)
Discussion Here ..!!!
SMS Subscribe
Security Alerts
Pages
Total Pageviews
Network Blogs
Get Domain Here :-
All Rights Reserved. http://borntohack.in Designed By Shaify Mehta


