twitter
    Find out what I'm doing, Follow Me :)
Showing posts with label Security. Show all posts

Wednesday, December 21, 2011

How to implement Encryption/Decryption on Data ?

Data encryption is a method in which highly important and sensitive data is converted into unreadable form before its storage or transmission over the LAN/WAN. You can read encrypted data or decrypt it, if you have access to password or secret key.
Case Study: MCS folder have two files name mcs-morning and mcs-evening. User A wants to secure mcs-morning file from user B and all other users in the network. But user B also wants to secure mcs-evening file from user A and all other users in the network.
To implement this, first make a folder with name MCS folder and set NTFS permission as only administrator, user A, user B access MCS folder and administrator have full rights and user A and user B have modify permission on MCS folder. Now to secure files, login with user A and follow the given steps.
First open the MCS folder and right click on mcs-morning file then click on properties.
  • Now click on advance button then check to encrypt content to secure data.
  • Click Ok button then apply.
  • Here system will ask you to secure the parent file and folder or only this file to secure data.
  • Now click Ok button to finish the user A settings.
  • Now to secure files, login with user B and follow the given steps.
  • First open the MCS folder and right click on mcs-evening file then click on properties.
  • Now click on advance button then check to encrypt content to secure data.
  • Click Ok button then apply.
  • Here system will ask you to secure the parent file and folder or only file to secure data.
  • Now click Ok button to finish the user B settings.
  • After implement encryption, user A can not read mcs-evening file and user B can not read the mcs-morning file.
Decryption of data
  • First open the MCS folder and right click on mcs-morning file then click on properties.
  • Now click on advance button then uncheck to encrypt content to secure data.
  • Click Ok button then apply.
  • Here your computer will ask you to decrypt the parent file and folder to insecure data then press Ok button to finish process.

Tuesday, December 20, 2011

How to Speed Up Windows Seven OS ?


With the release of Windows 7, Microsoft may just have introduced the fastest operating system in the world. For those speed junkies who are never satisfied, we have provided a few tips that will help you make your PC even faster.

Disable Automatic Disk Defragmentation

The Automatic Disk Defragmentation feature in Windows is designed to maintain the health of the operating system. However, it also makes Windows run a little slower. You can put an end to this by disabling the feature and manually running at your leisure. To do so, click “Start” and select “Computer.” Next, right click on your primary hard drive and select “Properties.” Lastly, select the “Tools” tab, click “Defragment Now” and uncheck the “Run on a schedule” option.

Utilize ReadyBoost

ReadyBoost is a built-in Windows 7 feature that allows you to use a USB flash drive to enhance system performance. How is this possible? The drive itself acts as additional computer memory!
In order to make use of this feature, you will need a USB drive with at least 2 GB of space. From there, you simply connect the drive to your computer, click “Start” and select “Computer.” Next, click on the USB drive and select “ReadyBoost.” Lastly, select “Use this device” and choose as much capacity as possible below on the “Space to reserve for system speed” slide.

Disable Windows Transparency

The transparency of windows is a great perk from a presentation aspect, but this may not be the case for those with older hardware as it can drastically impact performance. The good thing is that transparency can be disabled with ease. Simply right-click on your desktop, select “Personalize,” choose the active theme and then navigate to “Windows Color.” Finally, uncheck the “Enable Transparency” option.

Disable Unwanted Features

There may be numerous Windows 7 features that you really don’t need. These same features could also slow down your computer. To disable them, click on “Start,” choose “Control Panel” and then select “Programs and features.” Next, select the “Turn Windows features on or off” option, navigate through the list and uncheck all the features you want to disable. Once you are done, simply click “OK” to remove those features.

Disable Startup Services

Startup services are notorious for slowing down performance in XP and Vista. The same holds true for Windows 7. You can disable unwanted services by hitting “Start,” typing “msconfig” in the search bar and clicking “Enter.” Click the “Services Tab” on the next window and deselect the services you do not want to automatically run at startup. While this all depends on preference, services that impact performance the most include “Offline Files,” “Tablet PC Input Services,” Terminal Services,” “Fax” and “Windows Search.”

Disable Minimizing/Maximizing Animations

Many users have already fallen in love with the minimizing and maximizing animation effects of windows. However, some may find it irritating after a while as it can eventually lead to slowdowns. If you want to disable this function, hit “Start,” enter “System Properties Performance” in the search bar and click “OK.” On the next screen, deselect the “Animate window when minimizing and maximizing” option and click “OK.”

Update Your Windows 7 Drivers

Lastly, ensure that you have the latest device drivers made specifically for Windows 7. Since your PC can have hundreds of drivers installed in it at any given time, this task can be tedious. Luckily there are 3rd party utilities out thee such as DriverFinder™, which can greatly speed up this process.

Monday, December 19, 2011

How To Store More Files On Dropbox Than Your Permitted Sapce

I have been using the cloud storage and file synchronization service Dropbox more frequently lately, and its is pretty awesome.

You probably know that Dropbox keeps track of all file changes automatically, with options to restore a previous version of the file. While looking at that I noticed that it is possible to restore deleted files as well. I first thought about writing an article about that as it is a pretty interesting feature. Especially so for users who have accidentally deleted files, and users who want to make sure that deleted files cannot be recovered. A recoverable copy on the Dropbox server is the last thing those users would want.

While I was investigating the issue I noticed that Dropbox subtracts the file size of deleted files from the available ratio. This basically means that you get additional upload space even though the files are still stored on Dropbox. Remember, deleted files do not get deleted right away.

The Dropbox FAQ states that deleted files and old file versions get saved for 30 days by the service before they are removed.

I also tested if it is possible to restore deleted files to get beyond the allowed quota of an account. Turned out that this is actually possible as well. Here is how it is done in detail.

Go to the Dropbox website and log into your account there. Switch over to Files to see all your files currently stored on Dropbox. Activate the show deleted files button to display deleted files and folders in the file listing. These are highlighted in grey, and the size says deleted instead of the real file size.


The idea is this. You upload files as usually to Dropbox. Once you come near the quote you start deleting files. Don’t worry, the files are still there. Your quote drops again and you can upload more files to Dropbox. I’m not sure if there is a limit or if you could theoretically go on forever. You can later on restore deleted files which can move you over your Dropbox quote.

You basically have two options to go upload more files to Dropbox than your quote allows.

Delete files temporarily to reduce the storage quota
Recover the files again at a later time to store files over the quota

Please note that deleted files won’t be synchronized, and that no new file versions will be saved by Dropbox. Have other Dropbox tips to share? Let me know in the comments.

Hide All Google Chrome Tabs With A Single Click


If you are working in a multi-user office or in a room that people may enter unannounced, you’d probably like an option to hide what’s shown on the screen when that happens. Maybe you like buying gifts for someone online, like to surf on a site that you are not allowed to access, or do not want your office colleagues to find out that you are into Britney Spears. Whatever it is, a Panic Button application can be the solution.
panic buttonA panic button or boss key application performs one or multiple actions when the button is activated. This usually includes hiding a window, but sometimes other things such as muting the volume.
The Google Chrome Extension PanicButton adds the functionality to the Chrome browser. It basically allows you to hide all open Chrome tabs with a single click.
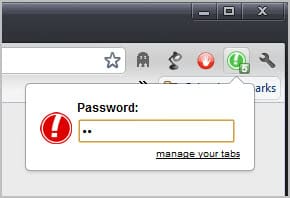
Here is how it works in detail. The extension adds a single button to the Chrome address bar upon installation. A left-click on the button hides all open tabs and displays a single blank tab instead in the browser interface. A second left-click loads the websites again so that you can continue using them. The extension saves the open tabs to bookmarks. This means that you may lose whatever you have been working on before you have clicked on the button.
A green icon with the number of saved tabs attached to it is displayed when the panic button has been activated.
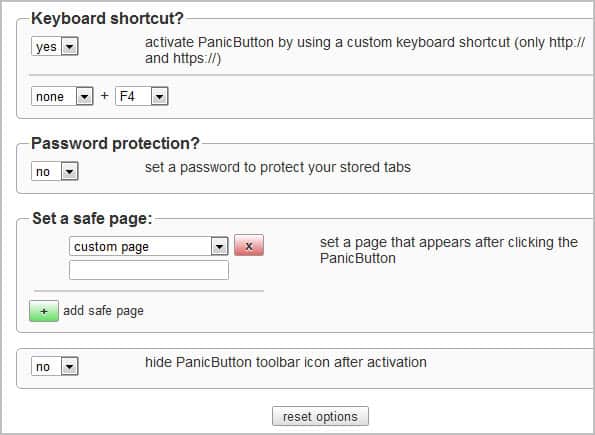
New users should take a look at the options of the extension by right-clicking on the icon and selecting options from the context menu.
Here it is possible to set a password to protect tabs from being restored. Anyone could theoretically click on the button to recover tabs otherwise.
You can furthermore change the default keyboard shortcut from F4 to another combination. Please note that you can only use the shortcut on http or https pages. It wont work on blank or internal pages.
panic button options
Safe pages, that is pages that are displayed when the panic button is activated, can be configured in the options as well. You can select to display new tab, empty or custom pages. Custom pages are websites that you need to enter. These are then loaded whenever the panic button is activated in the browser.
The hide panic button option finally hides the button once it has been activated. This removes the indication from Chrome’s toolbar.
Chrome users can download the PanicButton extension from the Google Chrome Extension repository.

Tuesday, November 29, 2011

How to hide your important data from other users?

Normally when you need to secure your important data from other users, then your first choice is to burn it on CD or put it to removable drive instead of hard drive. But imagine if your data size is more than 100 GB then it is not easy to burn it on CD. No worry, you can save your full drive from other users access using this trick. Check out InfoSec Institute for IT courses including computer forensics boot camp training

Perform the given steps to hide your system data partition:

  • To enable this feature, you will need to be logged into your computer with administrative rights.

  • First click on Start button to open "Run" and type "CMD" (without the quotes) then press Ok button to open Command Prompt.

Now type diskpart on the blinking cursor and wait for 5 seconds to appear diskpart> utility.

To show the list of volume, type list volume command after the diskpart> prompt, this command will show you all system drives detail.

Now first select the volume that you want to hide, for example,

if you need to hide F drive then first type select volume 2 (in this case) and press enter button.

After loading volume, type remove letter F (in this case) to hide F drive.

Now exit from command prompt and open My Computer to verify drives.

But next time, when you want to unhide the D drive, just run assign drive F command after loading volume 2.


Sunday, November 20, 2011

How to Secure a Wireless Network from Hackers?

The reason we secure a wireless network is to stop people from using the services of our network who don't have permission to utilize them. It is harder to secure a wireless network from hackers as compared to a classic wired network. This is due to the fact that a wireless network can be accessed anywhere inside the range of its antenna.

In order to secure a wireless network from hackers, we should take proper steps to save ourselves against security issues. If you don't secure a wireless network from hackers, you might end up without its service. The consequence might also include the utilization of our network to attack further networks. To secure a wireless network from hackers, you should follow these simple wireless networking tips:

1. Strategic antenna placement:

The first thing you have to do is to position the access point's antenna in a place which restricts the range of its signal to go further than the required area. You should not put the antenna close to a window because glass can't obstruct its signals. Place it in a central location of the building.

2.Use WEP:

WEP stands for Wireless encryption protocol. It's a customary technique for encrypting traffic on a wireless network. You should never skip it as that will allow hackers to get instant access to the traffic over a wireless network.

3. Change the SSID, disable the broadcast of SSID:

SSID stands for service set identifier. It is the recognition thread utilized by the wireless access point due to which the customers are capable of starting connections. For every wireless access point arranged, select an exclusive as well as unique SSID. Also, if it's attainable, hold back the broadcast of the SSID out over the antenna. It won\t appear in the listing of offered networks, while being able to provide services as usual.


4. Disable DHCP:

By doing this, the hackers will have to decode the TCP/IP parameters, subnet mask as well as the IP address in order to hack your wireless network.


5. Disable or modify SNMP settings:

Change the private as well as public community settings of SNMP. You can also just disable it. Otherwise the hackers will be able to utilize SNMP to get significant info regarding your wireless network.


6. Utilize access lists:

For additional security of your wireless network, and if your access point support this feature, employ an access list. An access list lets us determine precisely which machinery is permitted to attach to an access point. The access points which include the access list can employ trivial file transfer protocol (TFTP) now and then in order to download modernized lists to steer clear of hackers.

Saturday, October 1, 2011

Reports: Microsoft Anti-Virus Erasing Google Chrome

Mighty funny timing, Microsoft. Reports say that Google’s Chrome browser was threatening to overtake Firefox in the coming months thanks to soaring usage rates caused, in large part, by FF and IE defectors. Then, this morning, Internet forums are awash with rage because a new update to Microsoft’s Security Essentials and ForeFront AV software began calling Chrome a Trojan and erasing it from users machines. Coincidence? Yeah, it probably is. But that still doesn’t change the fact that users are pissed.

Both ZDNet and The Register are reporting that they’ve received numerous complaints about the critical false positive. The AV programs are identifying Chrome as part of the ZeuS Trojan, and users who try to reinstall the browser are finding that the antivirus program won’t let them, citing “PWS:Win32/Zbot” as a severe threat. Register readers are reporting that the beta version of Chrome isn’t affected, nor are browsers that are configured to not send Google any information. Nobody’s saying anything official at the moment – both Google and Microsoft have been mum on the matter.

So, has any of you been affected by the bug? Chime in with your experiences in the comments! I've got Chrome and MSE installed on my laptop, and nothing fishy has gone on yet.

Monday, September 5, 2011

ManicTime : Keeps Track of your PC Activities

If you’d have to analyze a normal work day on your computer, how would it look like? What are the common applications that you open? Which website do you spend the most time on? It can be quite difficulty to calculate those numbers manually, and it is likely that you may be way off. That’s where time tracking software like ManicTime can help. The program monitors all PC activities automatically, so that you know exactly what you have done on your PC at a specific time of the day.

The program is offered as a limited free version and commercial versions. ManicTime Free comes without program support and advanced features like password protection, categorization of applications or advanced search functionality.

The free version of the time tracking software tracks and analyzes application usage automatically, and creates charts and statistics about the general computer usage.

When you start the program for the first time, you will see a tabbed interface that is divided into two main areas. The area at the top of the program window displays the current day and a time bar that visualizes computer, application and document usage on the computer. Different programs and documents are displayed with different color sets. Hovering the mouse over them displays tooltip information about the program, time and duration as well as document titles and related information.


The lower half of the screen displays the active application or document (e.g. browser tab) and totals combined (e.g. how long you spend in the Firefox browser).

The statistics tab displays various information like the top applications and documents, top computer usage or day durations.

You can pause tracking at any time with a right-click on the program’s system tray icon and the selection of “Go off the record”.

The information that ManicTime present can be a real

Sunday, August 14, 2011

HTTPS Everywhere 1.0: Very Useful Firefox Extension

I reviewed one of the first versions of HTTPS Everywhere for the Firefox web browser back in the middle of 2010. The Firefox extension, which forced https connections to a handful of supported web pages, has come a long way since then. The developers today have announced the release of HTTPS Everywhere 1.0 which includes support for over 1,000 web sites. Among the supported websites are previously supported sites like Google Search, Facebook or Wikipedia, and new services and pages like all WordPress.com blogs, Nintendo, Netflix, Dropbox or the UN website.

The extension is useful in situations where websites support both the http and https protocol without a clear distinction between the two protocols, or options to always use https when a user is connecting to the website.

HTTPS Everywhere basically ensures that https is always used when connecting to one of the supported properties. Connections that are initiated by the user via http are automatically switched over to https in this case.

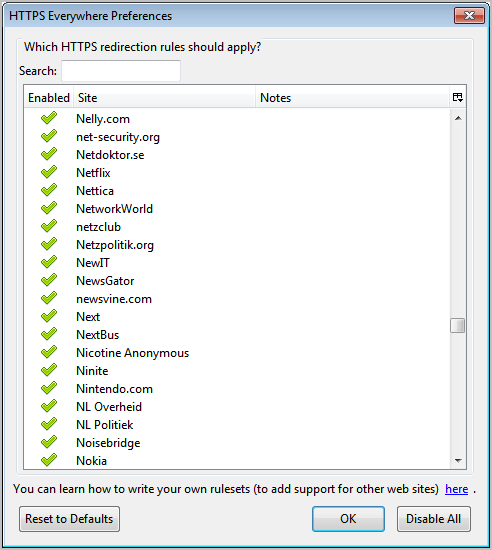
The add-on options list all supported websites and services. It offers a search to find a specific site and a switch to enable or disable the https redirection.
https-everywhere

Web users who know their way around regular expressions can even create their own rulesets to add support for websites and services that are not included in the default site listing.

New users to HTTPS Everywhere should take a look at the extensive FAQ section at the development site over at EFF.org for detailed information about the add-on and how it protects the user.

It may happen that HTTPS Everywhere breaks some part of a website, which can usually be attributed to inconsistent support for HTTPS on those sites. The only option then is to disable the rule and report the problem to the company or individual running the website.

HTTPS Everywhere can be installed directly from the EFF website. Cautious users can look at the source code of the project which is also available on the project site.

Phones Running Google's Android are Prone to Hacking: Experts

A mobile security expert says he has found new ways for hackers to attack phones running Google Inc's Android operating system.

Riley Hassell, who caused a stir when he called off an appearance at a hacker's conference last week, told Reuters that he and his colleague Shane Macaulay decided not to lay out their research at the gathering for fear criminals would use it attack Android phones.

He said in an interview he identified more than a dozen widely used Android applications that make the phones vulnerable to attack.

"App developers frequently fail to follow security guidelines and write applications properly," he said.

"Some apps expose themselves to outside contact. If these apps are vulnerable, then an attacker can remotely compromise that app and potentially the phone using something as simple as a text message."

He declined to identify those apps, saying he fears hackers might exploit the vulnerabilities.

"When you release a threat and there's no patch ready, then there is mayhem," said Hassell, founder of boutique security firm Privateer Labs.

Hassell said he and Macaulay alerted Google to the software shortcomings they unearthed.

Google spokesman Jay Nancarrow said Android security experts discussed the research with Hassell and did not believe he had uncovered problems with Android.

"The identified bugs are not present in Android," he said, declining to elaborate.

It was the first public explanation for the failure of Hassell and Macaulay to make a scheduled presentation at the annual Black Hat hacking conference in Las Vegas, the hacking community's largest annual gathering.

They had been scheduled to talk about "Hacking Androids for Profit." Hundreds of people waited for them to show up at a crowded conference room.

Hassell said in an interview late on Thursday the pair also learned -- at the last minute -- that some of their work may have replicated previously published research and they wanted to make sure they properly acknowledged that work.

"This was a choice we made, to prevent an unacceptable window of risk to consumers worldwide and to guarantee credit where it was due," he said.

A mobile security researcher familiar with the work of Hassell and Macaulay said he understood why the pair decided not to disclose their findings.

"When something can be used for exploitation and there is no way to fix it, it is very dangerous to go out publicly with that information," the researcher said. "When there is not a lot that people can do to protect themselves, disclosure is sometimes not the best policy."

Hassell said he plans to give his talk at the Hack in The Box security conference in Kuala Lumpur in October.

Saturday, August 13, 2011

Download Your Favorite Security Software With New Free "Security Software Downloader"

The first version of Security Software Downloader was released in 2010. The program allows Windows users to download security software comfortably from the program interface. That’s handy especially on new systems, on systems that need a change in security software and PCs that are infected by malware that the installed antivirus software cannot remove.

Security Software Downloader 2 has just been released by its developers. The program itself is still Open Source and compatible with all 32-bit and 64-bit editions of the Windows XP, Vista and Windows 7 operating system.

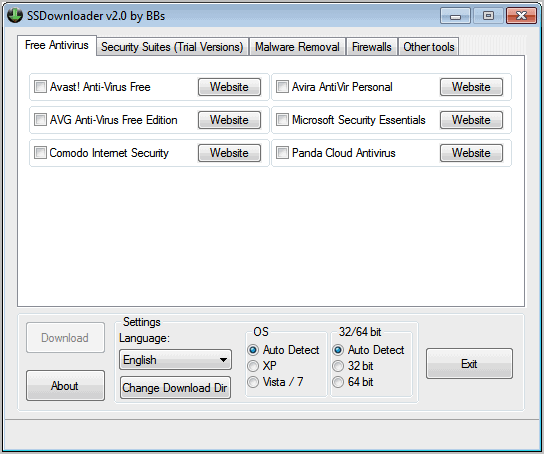
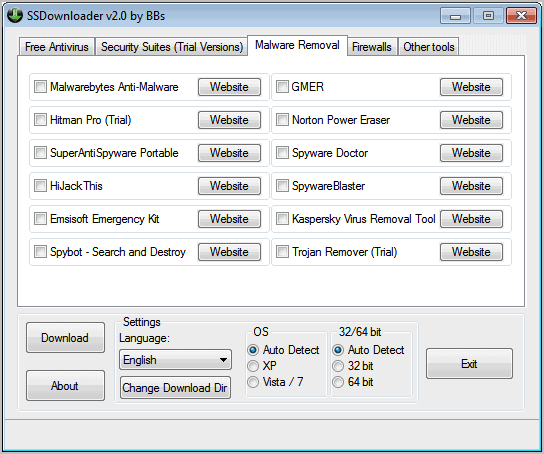
The first change that users will notice is the new and improved user interface which now separates security software in groups like free antivirus, malware removal or firewalls.
That’s better than the all on one page approach of the program’s predecessors.

security software downloader

The program is set to auto detect the operating system and version of the operating system. Users can make the changes manually which is helpful if the auto detection did not detect the correct OS and version.

Software can be selected with a click in the adjacent check box. It is possible to select multiple programs at once. A click on the download button downloads all selected security applications to the operating system. Windows users who do not want the programs to be downloaded to their desktop should click on the 

Change Download Dir button to change the save location.
The program is not providing any information about the security software in its interface. A website button next to each program links directly to the program homepage on the Internet.

So what is new in Security Software Downlader? The developer has added support for additional programs, raising the number of applications to over 50. Among the new tools are Panda Internet Security, the password manager LastPass, Spybot Search & Destroy and CyberGhost VPN.

ssdownloader

Security Software Downloader is still a handy program for users who would like to download multiple security applications at once from the Internet. It can also be handy for users who want to discover and test new products.
SSDownloader can be downloaded from the project website over at Sourceforge.

Wednesday, August 10, 2011

Internet LOCK.......

internet lock

Use Internet Lock to control internet access, block or password protect internet connection and internet programs: Internet Explorer, Firefox, Messenger, Outlook… Internet Lock is the access control and password protection solution for your internet connections and programs. With Internet Lock, you can control the internet connections and programs on your computer. Internet Lock can password protect or block any kind of internet programs from accessing internet, for example: password protects all web browsers including Internet Explorer, Firefox etc.[Download]

Monday, July 18, 2011

Get Avast Internet Security One Year License For Free

Like many other security software companies, Avast is offering both a free basic version of their software and a commercial advanced version that comes with extra features. Avast Internet Security is the companies’ flag ship product that includes all the features of the free and pro versions of their product plus a firewall, antispam protection or identity theft protection.

The German computer magazine COM is currently running a giveaway of avast! Internet Security. The promotional web page is accessible by anyone. While only in German, it provides a license that works with English versions of Avast Internet Security as well.

Here is how you can get your free license of Avast Internet Security. Start by downloading the latest version of the security program from the official website. The link points to the English version of the software. I have not tested other language versions, they may work as well.

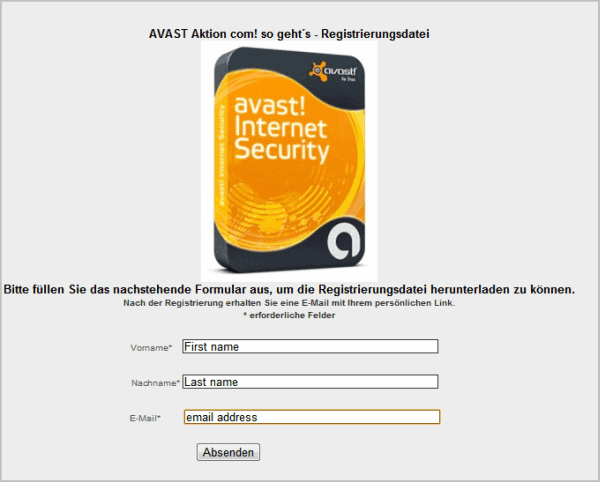
Go to the promo page and fill in your first name, last name and email address. You will receive a license download link in an email once you click on the send (Absenden) button.

avast internet security license

The license file is zipped which means you need to unzip it first. Make sure you have Avast installed before you click on the License com! so geht´s.avastlic file. A click on the file registers the program. You can alternatively open Avast Internet Security and load the license under Registration Options from within the program interface.

The license itself expires April 2012, which means you get about nine months of free use from this marketing opportunity.

You can post your suggestions and reviews about this post in comments....!!

Sunday, July 17, 2011

Hack connected Computers in WIFI.........

The internet is ever growing and you and I are truly pebbles in a vast ocean of information. They say what you don’t know can’t hurt you. When it comes to the Internet believe quite the opposite. On the Internet there a millions and millions of computer users logging on and off on a daily basis. Information is transferred from one point to another in a heartbeat. Amongst those millions upon millions of users, there’s you.

In this tutorial i am going to show you how to to access someone’s facebook, youtube, and many other accounts which is using the same WiFi as you.

You need:
Mozilla Firefox
Firesheep – A Firefox extension that demonstrates HTTP session hijacking attacks.
WinPcap – WinPcap is an open source library for packet capture and network analysis for the Win32 platforms. It includes a kernel-level packet filter, a low-level dynamic link library (packet.dll), and a high-level and system-independent library.

Step 1: Install WinPcap then drag the Firesheep add-on, and put it on the Firefox icon. Firefox will open and will ask you to install the add on. Install it and restart Firefox.

Step 2: Open the add-on (You can do it by clicking on View ->Sidebar -> Firesheep), then click on Start Capturing and it’ll start capturing, and as soon as somebody logs in any account it’ll show up the logs, and then you can access their account.

Simple, but functional and VERY effective method to hack someones facebook, youtube, myspace, etc. account through WiFi.

Thursday, July 7, 2011

iH8sn0w iFaith-The SHSH Dumper

After weeks of anticipation, iH8sn0w has announced iFaith, the SHSH dumper. iFaith will allow users to dump the SHSH of the current firmware on the device, even if Apple is not signing. For example, if your device is on 4.0 and you want the blobs, you can use this program to rip, or dump the blobs from the device.
It is important to note that this only works if your device is susceptible to the Limera1n jailbreak (everything but iPad 2). The iPod Touch 2G and iPhone 3G are also not compatible simply because there is no need for them (latest firmware is always jailbreakable). In short, iFaith allows you to:

? Dumps SHSH Blobs
? Build *signed* IPSW with dumped SHSH blobs
? Submits dumped SHSH blobs to remote server for backup.

iFaith will be released within the hour for Windows. Mac version will be out in a few weeks. The device does not have to be jailbroken, but does have to be on the firmware of the blob you want to dump.


Sunday, July 3, 2011

What are MD5 and SHA-1 Hashes


banner-01

You may have seen MD5 hashes listed next to downloads during your internet travels, but what exactly are they? Let’s take a look at what these cryptic strings are and how you can use them to verify your downloads.

What Are Hashes and What Are They Used For?

500px-Cryptographic_Hash_Function.svg
(Image credit: Wikimedia Commons)

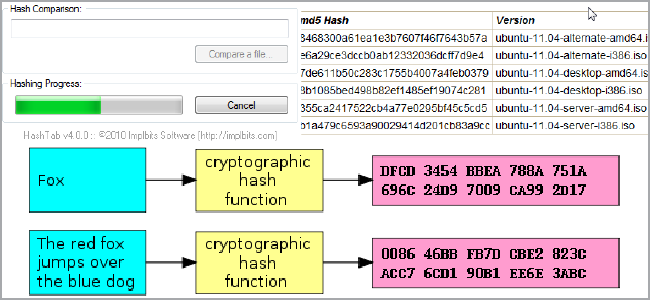
Hashes, “digests,” are the products of cryptographic algorithms(in short, they’re a set of instructions used by computers to manipulate data). Many hash functions are designed to produce a fixed-length digest, regardless of the size of the input data. Take a look at the above chart and you’ll see that both “Fox” and “The red fox jumps over the blue dog” yield the same length output.

Another factor is complexity. Compare the second example in the above chart to the third, fourth, and fifth. You’ll see that despite a very minor change in the input data, the resulting hashes are all very different from one another. This is a sign of complexity of the algorithm (at least to our non-programmer eyes) and helps make it so that working backwards from the hash to the data is very difficult. Passwords are often stored as hashes because of this reason; it’s easy to take the password during a login attempt and compare it to the stored hash. On the the other hand, if someone has the hash, it’s very difficult to work backwards to the original input. When people try to crack passwords, they usually don’t work backwards, but instead use a dictionary of known hashes (usually of common passwords and key patterns) to compare the stolen ones with.

Data Verification

sshot-1

MD5, the Message-Digest Algorithm, has been used in multiple types of security-based programs in the past, but it’s also widely employed for another purpose: data verification. These types of algorithms work great to verify your downloads. Imagine, if you will, you’re online trying to grab the latest Ubuntu release from BitTorrent. Some horrible troublemaker starts distributing a version of the .iso you need but with malicious code embedded into it. Not just that, he’s clever, so he makes sure the files are exactly the same size. You would’t know you had the bad file until you tried to boot the CD, and by then, permanent damage could have already occurred!

sshot-2

Thankfully for us, Canonical posts the MD5 checksums for its images online. You can run a hash check yourself with any number of tools, and then check it against the posted checksum. If there are any differences at all, you know that the file you have was tampered with, did not complete properly, or something else prevented the data from matching. This way you prevent any damage to your system before you run anything, and you can just re-download the appropriate file.

This comes in handy not just for Linux distros, but for other things like BIOS files, third-party Android ROMs, and router firmwares – all things that could potentially “brick” your devices if the data is tainted. In general, large files have a larger risk of data corruption, so you may want to run your own checksums if your archives are important.

MD5 is no longer considered completely secure, and so people have started to migrate to other commonly used hash algorithms like SHA-1. This last one in particular is used for data verification more and more often so most tools will work with both of these algorithms.

Thursday, June 30, 2011

Tip to Implement Best Password Policy for Windows Authentication

By default Windows accepts both short and long passwords as the Windows login password.
Some users use extremely short passwords, which can easily be brute forced.

So in order to set the minimum number
of characters or the minimum length of the password, simply follow the following registry trick-:

1. Launch the Windows Registry Editor i.e. c:\windows\regedit.exe

2. Scroll down to the following registry key:
HKEY_LOCAL_MACHINE\SOFTWARE\Microsoft\Windows\CurrentVersion\Policies\Network

3. Click on Edit > New DWORD Value.

4. Name this new DWORD value as MinPwdLen and in the data field, enter the minimum number of characters
the password has to be of. One thing to note here is that this value is in Hexadecimal.

5. Now, Press F5 and your system just became a tiny bit securer but certainly not unhackable.

Wednesday, June 29, 2011

Hack Facebook and Twitter Passwords through wifi and also protection from this hack......

Using Facebook or Twitter account while you are on a public network unsecured wifi is like giving invitation to hackers.Then this is the time that you should think about your account security.If you think that facebook or Twitter are secured websites then it’s the time to face the reality. they are not secured.Whenever you login into your facebook or twiiter account check the address bar of your browser you will see something likehttp://www.facebook.com/home.php?Similar is the case with twitter.They use http protocol instead of secured https protocol.But if you login into your gmail account you will notice that it uses https protocol.

So, the trick I am telling you works only on websites like facebook, twiiter, flickr but not on secured websites like Gmail. So here isTrick to Hack Facebook and Twitter Password on Wifiand also the method of protection from this hack.This trickdoesn'trequire any programmingknowledgeand everyone can use this trick easily.

1.Download firesheeFirefox extension.This is a freeware extension for firefox browser.


2. Once installed it will open a sidebar window into your firefox browser.
3.Now it will show all the people who are connected to unsecured wifi network.Once they login into your facebook or twitter account you will get a notification and with a single click you can login into their account.

This whole thing work on the technique of cookie hijacking.Once your session cookie is hacked then anybody can login into your account.These cookies can be easily caputered on unsecured wifi network.

The best way to protect yourself from such a hacking trick is to avoid using your facebook or twitter accounts on unsecured wifi networks as it is a security lapse from the websites not on your side.