
twitter
    Find out what I'm doing, Follow Me :)

Tuesday, December 20, 2011

How to Speed Up Windows Seven OS ?


With the release of Windows 7, Microsoft may just have introduced the fastest operating system in the world. For those speed junkies who are never satisfied, we have provided a few tips that will help you make your PC even faster.

Disable Automatic Disk Defragmentation

The Automatic Disk Defragmentation feature in Windows is designed to maintain the health of the operating system. However, it also makes Windows run a little slower. You can put an end to this by disabling the feature and manually running at your leisure. To do so, click “Start” and select “Computer.” Next, right click on your primary hard drive and select “Properties.” Lastly, select the “Tools” tab, click “Defragment Now” and uncheck the “Run on a schedule” option.

Utilize ReadyBoost

ReadyBoost is a built-in Windows 7 feature that allows you to use a USB flash drive to enhance system performance. How is this possible? The drive itself acts as additional computer memory!
In order to make use of this feature, you will need a USB drive with at least 2 GB of space. From there, you simply connect the drive to your computer, click “Start” and select “Computer.” Next, click on the USB drive and select “ReadyBoost.” Lastly, select “Use this device” and choose as much capacity as possible below on the “Space to reserve for system speed” slide.

Disable Windows Transparency

The transparency of windows is a great perk from a presentation aspect, but this may not be the case for those with older hardware as it can drastically impact performance. The good thing is that transparency can be disabled with ease. Simply right-click on your desktop, select “Personalize,” choose the active theme and then navigate to “Windows Color.” Finally, uncheck the “Enable Transparency” option.

Disable Unwanted Features

There may be numerous Windows 7 features that you really don’t need. These same features could also slow down your computer. To disable them, click on “Start,” choose “Control Panel” and then select “Programs and features.” Next, select the “Turn Windows features on or off” option, navigate through the list and uncheck all the features you want to disable. Once you are done, simply click “OK” to remove those features.

Disable Startup Services

Startup services are notorious for slowing down performance in XP and Vista. The same holds true for Windows 7. You can disable unwanted services by hitting “Start,” typing “msconfig” in the search bar and clicking “Enter.” Click the “Services Tab” on the next window and deselect the services you do not want to automatically run at startup. While this all depends on preference, services that impact performance the most include “Offline Files,” “Tablet PC Input Services,” Terminal Services,” “Fax” and “Windows Search.”

Disable Minimizing/Maximizing Animations

Many users have already fallen in love with the minimizing and maximizing animation effects of windows. However, some may find it irritating after a while as it can eventually lead to slowdowns. If you want to disable this function, hit “Start,” enter “System Properties Performance” in the search bar and click “OK.” On the next screen, deselect the “Animate window when minimizing and maximizing” option and click “OK.”

Update Your Windows 7 Drivers

Lastly, ensure that you have the latest device drivers made specifically for Windows 7. Since your PC can have hundreds of drivers installed in it at any given time, this task can be tedious. Luckily there are 3rd party utilities out thee such as DriverFinder™, which can greatly speed up this process.

Monday, December 19, 2011

How To Store More Files On Dropbox Than Your Permitted Sapce

I have been using the cloud storage and file synchronization service Dropbox more frequently lately, and its is pretty awesome.

You probably know that Dropbox keeps track of all file changes automatically, with options to restore a previous version of the file. While looking at that I noticed that it is possible to restore deleted files as well. I first thought about writing an article about that as it is a pretty interesting feature. Especially so for users who have accidentally deleted files, and users who want to make sure that deleted files cannot be recovered. A recoverable copy on the Dropbox server is the last thing those users would want.

While I was investigating the issue I noticed that Dropbox subtracts the file size of deleted files from the available ratio. This basically means that you get additional upload space even though the files are still stored on Dropbox. Remember, deleted files do not get deleted right away.

The Dropbox FAQ states that deleted files and old file versions get saved for 30 days by the service before they are removed.

I also tested if it is possible to restore deleted files to get beyond the allowed quota of an account. Turned out that this is actually possible as well. Here is how it is done in detail.

Go to the Dropbox website and log into your account there. Switch over to Files to see all your files currently stored on Dropbox. Activate the show deleted files button to display deleted files and folders in the file listing. These are highlighted in grey, and the size says deleted instead of the real file size.


The idea is this. You upload files as usually to Dropbox. Once you come near the quote you start deleting files. Don’t worry, the files are still there. Your quote drops again and you can upload more files to Dropbox. I’m not sure if there is a limit or if you could theoretically go on forever. You can later on restore deleted files which can move you over your Dropbox quote.

You basically have two options to go upload more files to Dropbox than your quote allows.

Delete files temporarily to reduce the storage quota
Recover the files again at a later time to store files over the quota

Please note that deleted files won’t be synchronized, and that no new file versions will be saved by Dropbox. Have other Dropbox tips to share? Let me know in the comments.

Hide All Google Chrome Tabs With A Single Click


If you are working in a multi-user office or in a room that people may enter unannounced, you’d probably like an option to hide what’s shown on the screen when that happens. Maybe you like buying gifts for someone online, like to surf on a site that you are not allowed to access, or do not want your office colleagues to find out that you are into Britney Spears. Whatever it is, a Panic Button application can be the solution.
panic buttonA panic button or boss key application performs one or multiple actions when the button is activated. This usually includes hiding a window, but sometimes other things such as muting the volume.
The Google Chrome Extension PanicButton adds the functionality to the Chrome browser. It basically allows you to hide all open Chrome tabs with a single click.
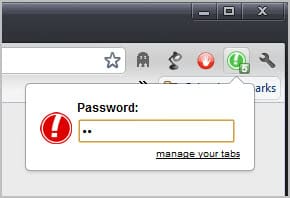
Here is how it works in detail. The extension adds a single button to the Chrome address bar upon installation. A left-click on the button hides all open tabs and displays a single blank tab instead in the browser interface. A second left-click loads the websites again so that you can continue using them. The extension saves the open tabs to bookmarks. This means that you may lose whatever you have been working on before you have clicked on the button.
A green icon with the number of saved tabs attached to it is displayed when the panic button has been activated.
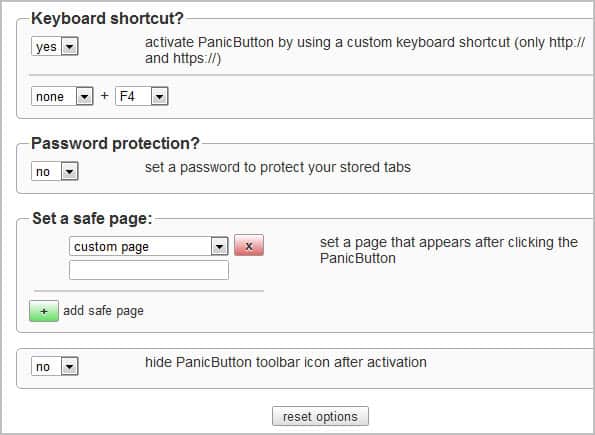
New users should take a look at the options of the extension by right-clicking on the icon and selecting options from the context menu.
Here it is possible to set a password to protect tabs from being restored. Anyone could theoretically click on the button to recover tabs otherwise.
You can furthermore change the default keyboard shortcut from F4 to another combination. Please note that you can only use the shortcut on http or https pages. It wont work on blank or internal pages.
panic button options
Safe pages, that is pages that are displayed when the panic button is activated, can be configured in the options as well. You can select to display new tab, empty or custom pages. Custom pages are websites that you need to enter. These are then loaded whenever the panic button is activated in the browser.
The hide panic button option finally hides the button once it has been activated. This removes the indication from Chrome’s toolbar.
Chrome users can download the PanicButton extension from the Google Chrome Extension repository.

Tuesday, December 13, 2011

How to make faster windows XP shutdown process?

Using this tip, you can make the windows XP shutdown process bit faster up to 50 percent than normal time. Normally windows XP takes time to close all running services and applications to complete the shutdown process, but if you have little experience to edit windows registry keys then you can easily manage the windows shutdown process.

Perform the following steps to manage the windows shutdown process:
  • To edit this feature, you will need to be logged into your computer with administrative rights.
  • First click on Start button to open "Run" and type "notepad" then press Ok button to open the Notepad Editor.
Now type the following code in Notepad.
 HKEY_CURRENT_USER\ControlPanel\Desktop
"AutoEndTasks"="1"
"HungAppTimeout"="1000"
"WaitToKillAppTimeout"="2000"

 HKEY_LOCAL_MACHINE\SYSTEM\CurrentControlSet\Control
"WaitToKillServiceTimeout"="2000" 
Save this file with .exe extension (as registry file, for example shutdown.exe).
Now double click on shutdown.exe file (in this case), and click Yes and again Ok button to update computer registry.

Thursday, December 8, 2011

Springtomize 2 for iOS 5

Springtomize 2 customized for the iOS 5 is now out. It is better than the previous release.

Features it provide:-

  1. Changing the Animations
  2. Change Dock Settings
  3. Lock Screen customization
  4. Icons customization
  5. Folder Customisation
  6. Multiple pages customization
Even now you can back up the settings and just with one tap you can go back to original settings with Time Machine.

For Now its a paid application in cydia but if you want it for free here's how

  1. Go to Cydia.
  2. Open the Manage Tab (On the Bottom of the Screen 4th option).
  3. After that open Sources.
  4. In the sources tap on Edit (Top Right Corner of the screen).
  5. The Tap Add (Visible on top Left of the screen when you tap Edit).
  6. Now Enter the url http://www.sinfuliphonerepo.com.
  7. After getting the repository added now go to the repository.
  8. Search for Springtomize 2 cracked and there it is all free for u.
  9. So Enjoy Customizing your iDevice. 
For inDepth review see here via iDownloadBlog

Tuesday, December 6, 2011

update iDevice to iOS 5.0 with iPad Baseband

The new and revolutionary iOS 5.0 is here and here is how to update and jailbreak and unlock the device running on iOS 5.0

The hardware / software you would require:-
1) iDevice
2) iOS 5.0 firmware(link).
3) redsnow (link here to download for mac and download for windows)


instructions for Windows Users:-

  • Open Rednsow and then press extras (turn off your device before that) and go in Pwned DFU mode by following the instructions on the screen.
  • Once in Pwned DFU mode, Open iTunes and press shift+restore and select the iOS 5.0 firmware that you just downloaded.
  • Restore the iPhone. (if there is any error mail me the error code, i will mail you the procedure to remove it.)  email-id- charanjit@borntohack.in
  • Once restored the firmware then you would want to skip setup because it asks for the Sim (if you are not on the official supported carriers) open redsnow once again.
  • in Redsnow go to Extras->Select ipsw-> back-> jailbreak-> check install cydia->(turn off the device)next-> follow the steps on the screen and then the device will reboot.
  • Now go ahead and setup the device it will not ask for the Sim and Cydia would be installed.
  • Now in Cydia install ultrasnow 1.2.4 and unlock the iDevice and enjoy any Sim.


instructions for Mac Users:-

  • Open Rednsow and then press extras (turn off your device before that) and go in Pwned DFU mode by following the instructions on the screen.
  • Once in Pwned DFU mode, Open iTunes and press alt+restore and select the iOS 5.0 firmware that you just downloaded.
  • Restore the iPhone. (if there is any error mail me the error code, i will mail you the procedure to remove it.)  email-id- charanjit@borntohack.in
  • Once restored the firmware then you would want to skip setup because it asks for the Sim (if you are not on the official supported carriers) open redsnow once again.
  • in Redsnow go to Extras->Select ipsw-> back-> jailbreak-> check install cydia->(turn off the device)next-> follow the steps on the screen and then the device will reboot.
  • Now go ahead and setup the device it will not ask for the Sim and Cydia would be installed.
  • Now in Cydia install ultrasnow 1.2.4 and unlock the iDevice and enjoy any Sim.


If you are on iPad or iPod then you can skip off the last step of installing ultrasnow as this will not be required..........

Tuesday, November 29, 2011

How to hide your important data from other users?

Normally when you need to secure your important data from other users, then your first choice is to burn it on CD or put it to removable drive instead of hard drive. But imagine if your data size is more than 100 GB then it is not easy to burn it on CD. No worry, you can save your full drive from other users access using this trick. Check out InfoSec Institute for IT courses including computer forensics boot camp training

Perform the given steps to hide your system data partition:

  • To enable this feature, you will need to be logged into your computer with administrative rights.

  • First click on Start button to open "Run" and type "CMD" (without the quotes) then press Ok button to open Command Prompt.

Now type diskpart on the blinking cursor and wait for 5 seconds to appear diskpart> utility.

To show the list of volume, type list volume command after the diskpart> prompt, this command will show you all system drives detail.

Now first select the volume that you want to hide, for example,

if you need to hide F drive then first type select volume 2 (in this case) and press enter button.

After loading volume, type remove letter F (in this case) to hide F drive.

Now exit from command prompt and open My Computer to verify drives.

But next time, when you want to unhide the D drive, just run assign drive F command after loading volume 2.


Thursday, November 24, 2011

Set a permanent formatting style for composing messages in Gmail

Gmail gives a lot of formatting options for formatting emails. You can change the color of text, change font size, color and more. Some are pretty comfortable with the default formatting in plain style but some may want to change the formatting of text with text colors, font etc. But if you prefer a certain formatting style and want it to use the same style for every email you compose, changing the formatting style every time can be a bit nagging. But with Gmail, you can easily set a default formatting style using a Labs feature.
Gmail default formatting style
To set a permanent formatting style for your emails, go to Mail settings on Gmail from the settings button at the top right corner in Gmail. Now click on the Labs tab and Enable the Default Text Styling feature. Now save the settings.

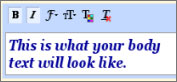
Now go back to the General Tab and you will see the Default Text Style section. You will see the text “This is what your body text will look like.” in the box. Using the buttons for Bold, Itailc, Underline, Text Color, Font, Text Size you can set a formatting for the text. Now save the changes.
Default text style GmailNow click on the Compose button and type in something; you will see the formatting by default. You can revert back to the default formatting style by clicking on the Remove Formatting button on the toolbar while creating a new email message.


Wednesday, November 23, 2011

How to tag a friend or a page on Facebook on mobile devices or with Javascript turned off

Its been long since Facebook let users tag their friends or like pages in status updates or comments. The feature first came to status updates and later on to comments as well. You can simply type the @ symbol and start typing the name of your friend and select one from the autocomplete. But this feature won’t work if you are using Facebook from a mobile browser that doesn’t support Javascript or if Javascript is turned off on your browser. But still, you can tag your friends using an alternate method.


You can tag your friends on browsers that don’t support Javascript as well. But to do this, you need to remember the profile ID of your Facebook friend. On the status update text box type the following:
@ [138558659573745:0]

Replace the number before “:0” with the profile ID of your friend. You can find the profile id of any of your friend by  copying it off their Facebook profile page. The Facebook profile page URL looks something like this:

http://www.facebook.com/profile.php?id=1742756183

But this trick doesn’t work for those who have already set their Facebook usernames. You can also use this trick for tagging Facebook fan pages.

Mobile Devices, Virtualization Are Biggest Security Challenges

http://www.flickr.com/photos/dcmetroblogger/4052573767/
Increased use of mobile devices, especially smartphones, in addition to the transition to virtualization, are key factors weighing on enterprises trying to sort out security strategy and budgets, according to a survey of 688 information and security managers.

According to the Ponemon Institute's "State of the Endpoint" study released this week, there are serious signs that IT operations and IT security often fail to work as a team. Forty percent say collaboration is "poor or non-existent" and 48% call it "adequate, but can be improved." Virtualization, mainly VMware and Microsoft Hyper-V, are increasingly the software platforms their organizations support, and 55% say virtualization does require "additional security measures," with most turning for help with that to the virtualization vendor or vendors with specialized virtualization security components.

But a surprising 41% indicated responsibility for virtualization security isn't clearly defined by department or function. Additionally, 21% said IT security was responsible, 15% said IT operations was and 11% said it was the job for IT compliance. Mobile devices - especially the use of employee-owned devices for work purposes - are also putting new stress on the IT department, according to the survey, which was sponsored by Lumension. The survey shows that mobile devices, especially smartphones, are counted as among "the greatest rise of potential IT security risk."