
twitter
    Find out what I'm doing, Follow Me :)

Tuesday, March 8, 2011

How To Use Multiple Google Accounts Together in One Web Browser

If you have more than one Google account setup, it can be very annoying having to sign out then back in each time you want to access a specific account. Here take a look at setting up to 3 of your Google accounts that you can use in one browser.


1. To manage multiple Google accounts without having to log in and out each time, navigate to http://google.com/accounts.
sshot-2011-02-24-[22-11-42]
2. Then sign in to one of your Gmail Accounts if you’re not already – it might be best to use your Primary account for this.
sshot-2011-02-24-[22-12-45]
3. Under Personal Settings next to Multiple sign-in click on Edit.
sshot-2011-02-24-[22-17-44]
4. To enable the feature, click the radio button next to On – Use multiple Google Accounts in the same web browser. You’ll also need to check each box to confirm you understand how to use multiple sign-in…then click Save.
Note: When enabling this feature, you’ll need to verify that not all Google products support multiple sign-in, Offline Mail and Offline Calendar is disabled and more. If you want to learn more about ways to use multiple accounts click the Learn More link.
sshot-2011-02-24-[22-19-24]
5. After you turn on the multiple accounts feature and save it…you can go back to the Accounts page and click the dropdown menu where you’re primary email account appears. Then click Sign in to another account.
sshot-2011-02-24-[22-26-24]
6. Now sign into another Google account using your Gmail address
sshot-2011-02-24-[22-29-11]
7. Then just repeat the steps for each account you want to use. Here we have 3 already…and you just need to select the one you want without having to log out then back in again. Very convenient!
sshot-2011-02-24-[22-30-57]
8. Keep in mind with free Google Accounts you can only use 3 sign-ins. If you try to add more you’ll see the following error message.
sshot-2011-02-24-[22-31-54]
9. If you want to start over with different accounts, or just want to turn the feature off, go into the Google Accounts page again, click Off – Use one Google Account at a time…then click Save.
sshot-2011-02-24-[22-43-15]
10. Then you can start over again using different accounts by repeating the steps above.
sshot-2011-02-24-[22-44-57]
If you have multiple Google Accounts using this feature is easy to setup, and you can switch between them by simply selecting the account you want from the dropdown menu. This feature is indeed a great time saver.

[via simplehelp ]

Monday, March 7, 2011

How To Install and Use the New Bing Bar in Internet Explorer 9

The old version of the Bing Bar was pretty useful, but took up a lot of real-estate on the IE screen. The new version is a lot more streamlined, includes easy access to data, and integrates quite nicely with IE 9.


sshot-2011-02-28-[22-14-42]

Install & Use the New Bing Bar

1. To get the new Bing Bar open IE 9 and click the Download Now button on the new Bing Bar site.
sshot-2011-02-28-[20-16-35]
2. At the bottom of IE 9 click to run the installer or download it to a convenient location on your hard drive to install later.
sshot-2011-02-28-[20-18-06]
3. When you start the installation you’ll see the Installing Bing Bar progress screen.
sshot-2011-02-28-[21-41-34]
4. It only takes about a minute to install and you’ll get some additional options to decide on. If you use Firefox you might want to uncheck the options to set Bing as your default search provider, setting MSN as your homepage, and sending anonymous info to the Bing team.
sshot-2011-02-28-[21-42-16]
5. Then at the bottom of IE 9 click the Enable button.
sshot-2011-02-28-[21-44-16]
6. Now you’ll have access to the new Bing Bar and what it offers. As you can see it’s a lot more streamlined, and it takes up less space in the browser if you hide the other menus and toolbars.
sshot-2011-02-28-[23-20-21]


How to reduce memory usage in Mozilla Firefox

Type about:config in the Firefox address bar

Search for browser.sessionhistory.max_entries

Double click on the value 50, change it to something lower, 5 should be good.

========================
What this means?

Averagely we surf less than 5 of the websites we previously surfed before, there is no need to use up that much memory (which is 50 by default).

[Via avitricks.page.tl]

SHOW YOUR PC QUAD CORE

SHOW YOUR QUAD CORE OR MORE

SHOW YOUR PC QUAD CORE OR MORE

GO TO START>RUN>TYPE REGEDIT>HKEY_LOCAL_MACHINE>HARDWARE>DISCRIPTION>SYSTEM>CENTRAL PROCESSOR>
ON RIGHT HAND SIDE RIGHT CLICK ON PROCESSOR NAME AND STRING AND THE CLICK ON MODIFY AND WRITE WHAT EVER YOU WANT
OR NAME IT QUAD CORE OR MORE

 [Via avitricks.page.tl]

Customize Windows Media Player Title Bar

Change the title bar to read Windows Media Player provided by , so if I had entered text TUSHAR , it would read: Windows Media Player provided by TUSHAR

[Start] [Run] [Regedit]

Go to 

HKEY_CURRENT_USER>Software>Policies>Microsoft Create the Key [WindowsMediaPlayer] Create String value named [TitleBar]

Data Type: REG_SZ // Value Name: TitleBar
Double click TitleBar and Enter the text to be displayed in the title bar.

Exit Registry / Reboot
 
[Via avitricks.page.tl]

Sunday, March 6, 2011

WebBrowserPassView, Reveal Browser Passwords

All modern web browsers have options to store passwords for the user which is beneficial in two ways; Users do not have to remember their passwords every time they want to log into a service on the Internet, and they do not have to enter the data into the forms manually.

The downside are security implications and potential recovery issues. Most web browsers offer to protect the stored passwords with a master password to avoid unauthorized access to the passwords. The feature is however usually deactivated and needs to be activated first.

WebBrowserPassView is a free portable application for Windows that has been designed as a universal browser password recovery tool. It currently supports Internet Explorer 4 to 8, Mozilla Firefox, Google Chrome and Opera.

The application scans the system for installed versions of supported browsers to retrieve password related information from each and display those information in a searchable index.

All login information are then displayed in the application window. The program displays the url of the password, the user name, password and the web browser the password was stored in.

web browser pass view

WebBrowserPassView can export selected login information in formats such as text, HTML or csv. A search is provided to find login information for specific sites, and passwords can be copied to the clipboard for direct pasting into web forms.

The software has several restrictions that prevent the successful recovery of passwords. Among the limitations are passwords that are protected by a master password, browsers that are stored on external hard drives, Internet Explorer passwords if the history file of Internet Explorer has been cleared and passwords that have been imported from Internet Explorer to Google Chrome.

Security software like Panda Global Protection, which I’m currently testing, may identify the program as potentially malicious. It is however safe to assume that the program is not dangerous since it has been developed by Nir Sofer. Panda for instance identifies the file as suspicious. A Virustotal scan resulted in a score of 3/43.

WebBrowserPassview is available for download at the Nirsoft project web page. The application is compatible with all 32-bit and 64-bit editions of Microsoft Windows.

The program has no option to recover passwords from portable installations. It is not clear yet if the feature will be added in future versions of the application.

[via ghacks ]

Disable Delete Confirmation Dialog Box: Tip

Are you fed up of confirmation dialog box on delete..??

You can disable this dialog box:

Two simple steps:


> Right click on recycle bin.

> Properties.

> Uncheck "display confirmation".

Saturday, March 5, 2011

How To Uninstall Windows 7 Service Pack 1

There have not been many complaints yet from users who have installed the service pack update on their Windows PCs. Still, there are always some cases where users want to uninstall the update again, likely because it is causing instabilities or other problems on the system that were not experienced before.
Those users need to uninstall the Windows 7 Service Pack 1 to restore the old state of the system prior to the update.

The Control Panel provides access to the easiest service pack uninstallation option.
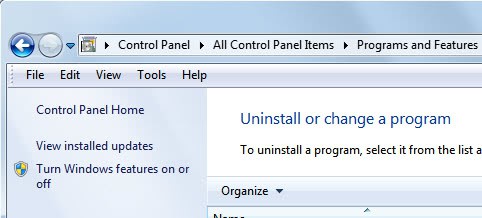
Users need to click on the Start orb on the taskbar and select Control Panel from the options. The uninstallation applet is available under Programs > Uninstall a program, or if all apples are displayed at once under Programs and Features.

Locate the View installed updates link in the left sidebar and click it to open the list of updates that have been installed on the computer system.

view installed updatesview installed updates

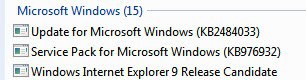
Windows displays a list of all updates that have been installed on the system. The service pack is basically nothing more than a larger update. Locate the Service Pack for Microsoft Windows (KB976932) entry under Microsoft Windows. This is the Windows 7 Service Pack 1. To uninstall it select it with a left-click and click the Uninstall link to uninstall it. you need to confirm your selection and restart the computer after the uninstallation process has finished.

uninstall windows 7 sp1

The uninstallation removes the service pack from the operating system.

Some users may not be able to uninstall the program via the Control Panel applet. This is for instance the case if the service pack installation corrupted the system.

It is then possible to use the command prompt to try and uninstall the service pack. An elevated command prompt is required. To get there, users need to click on the start orb, then All Programs > Accessories, and right-click on the Command Prompt entry there and select Run as administrator.

They then need to use the following command to uninstall the service pack again:

wusa.exe /uninstall /kb:976932

A confirmation is again required before the service pack is uninstalled by Windows.

System restore, or previously created backups, are another alternative if they have been created before the service pack was installed on the Windows 7 system. (via)

Create custom counter strike spray/logo


  1. First download HLtag converter from here .
  2. Extract the file and execute the tag converter.
  3. Click on open image and select the image you want.
  4. Click on Adjust Image. A window will display. First click Auto Size, and then click Apply changes and convert to 256 colors.
  5. Now click save tag and select “export to wad file”.
  6. Save the wad file twice. Name the first file as tempdecal and second as pldecal. Copy both files, tempdecal.wad and pldecal.wad to cstrike folder of your Counter Strike 1.6 client.
  7. Done

Friday, March 4, 2011

Autologon For Windows

There is really no need for typing in your Windows account username and password every time you log into the operating system, at least not if you are the only user with access to the Windows PC. I personally have configured my system to automatically log me in every time the computer is booted and Windows is selected as the operating system. This is obviously not practical for everyone but it can make the life of Windows home users and single PC users a tad more comfortable.

Autologon For Windows is a free Sysinternals software that makes it a lot easier to setup the automatic login. Users do not have to go through various system settings to configure auto login, all they need to do is to launch the program, enter their user account data and click on the Enable or Disable button.

autologon for windows

And that’s it. Autologin saves the data in encrypted form to the Windows Registry if the auto logon feature is enabled by the user. No login screen is shown from then on when the operating system is loaded. Windows bypasses the screen and the selected user is logged on automatically.

Autologon for Windows fills out the username and domain automatically, with an option to change them if required. Users who want to disable automatic logon again can do so by entering the data and selecting the Disable button in the interface. It is furthermore possible to disable automatic logon for a particular session by holding down the Shift key during system boot.

The portable program accepts command line arguments in the form autologon user domain password. Autologon for Windows is available for download at the Sysinternals website over at Microsoft. The software is compatible with Windows XP and higher as well as the server variants Windows Server 2003 and higher.

[via ghacks ]